Have you ever visited a site that just drags? You click a link, and it takes forever to load. Images appear one by one, and the site feels like it is lagging behind your mouse. It is frustrating, right? As a website owner, that is the last impression you want to leave on your visitors.
In today’s digital world, speed is not a necessity; it is a requirement. People expect websites to load instantly. In fact, studies show that even a 2-second delay in loading a website makes people leave your site by 32%. So, it is not just about user experience. It is about keeping your visitors and growing your business.
One of the biggest causes for slowing down of websites is something called unused JavaScript. That is just extra code sitting on your site that doesn’t actually do anything useful. It is like carrying a heavy backpack full of stuff you don’t need on a long hike, it slows you down. Your browser still has to download, read, and run all that extra code, even if it is not being used. This can come from:
- Old plugins or themes that add features you don’t use.
- Third-party tools like social media buttons or trackers.
- Outdated or messy code that is no longer relevant.
All of this adds weight to your site and makes it slower for users to interact with it.
Here the question arises: can you fix it easily? The answer is cleaning up unused JavaScript is totally doable, even if you are not a developer. Let’s understand how to remove the unnecessary code and give your site a serious speed boost.
What Is Unused JavaScript?
Unused JavaScript is simply extra code taking up space on your site that doesn’t really do anything helpful. When a person comes to your site, their browser loads all the code including these unneeded pieces, slowly creeping along. Imagine packing for vacation and bringing stuff you never use. It only makes everything heavier and slower.
Where Does This Extra Code Come From?
- Themes & Plugins: WordPress themes and plugins tend to have features that you may not even need.
- Third-Party Tools: Things such as social media buttons or analytics can introduce additional code.
- Old Code: As your site gets larger, there will be some code that becomes outdated or obsolete.
Why Remove It?
- Faster Website: There will be shorter loading times with less code.
- Improved User Experience: Visitors won’t get frustrated waiting for your site to load.
- Lower Resource Consumption: Conserves bandwidth and decreases server load.
- Simpler Maintenance: Neat code is simpler to maintain and modify.
How to Identify Unused JavaScript?
Google PageSpeed Insights
- Go to PageSpeed Insights
- Enter your site URL and press “Analyze”
- Check under “Opportunities” for “Remove unused JavaScript”
- It will display which files are slowing you down
GTmetrix
- Visit GTmetrix
- Enter your site URL and perform a test
- Check the “Waterfall” tab → “JS” section
- You will see which JavaScript files are the biggest and when they load.
How to Remove Unused JavaScript from Your Website?
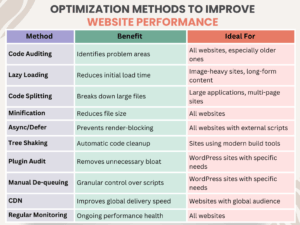
1. Identifying the Culprit: The First Step to a Speedier Site
You should know what you are working on before you can fix it. Imagine it like cleaning out your closet. You need to take everything out so that you can look at what is there and what you really use. For your site, Google PageSpeed Insights and the Chrome DevTools Coverage tab are your friends. They are free and amazingly powerful. The Coverage tab, in fact, will give you a visual representation of how much of your JavaScript is actually being executed. It color-codes your code, so you can immediately see what’s running (green) and what’s idle, taking up space (red). It is an eye-opener! Knowing precisely which scripts are the heaviest and are used the least is the initial and most important step on any optimization path.
2. Lazy Loading: A Clever Approach to Heavy Content
Suppose you are browsing a long article with several images. Do you actually need to load all your images the second the page loads? Most likely not. Lazy loading is the exact same idea but applied to your JavaScript files. Rather than loading all your scripts immediately, you can make them load only when they are used, such as when a user scrolls down to a certain section or presses a button. This is particularly helpful for such things as image galleries, video players, or comment streams that are “below the fold” (i.e., not on the first screen). It has a massive impact on the initial page load time, so your site can be snappy and responsive right out of the box.
3. Code Splitting: Disassembling the Big Bloat
Do you remember trying to push a massive piece of furniture by yourself? It is almost impossible. But if you divide it up into smaller, bite-sized chunks, the work is a whole lot simpler. The same concept can be applied to your site’s JavaScript. Code splitting is the process that divides your massive JavaScript files up into smaller, specialized “chunks.” The browser only needs to download the code it requires for the current page instead of the whole codebase. This is a game-changer for single-page applications and big sites.
For instance, on an online shop, you might have one bundle of code for the homepage, a second for the product pages, and a third for the checkout process. Then, a visitor on the homepage would not need to download the checkout code until they are about to make a purchase, resulting in their first experience being much quicker. This is one of the best ways to remove unused JavaScript from the first load.
4. Async and Defer: The Easy Solution for Smoother Loading
This is an easy but effective trick. When you insert a script into your website, the browser will normally pause everything else to download and execute that script. This is referred to as “render-blocking” and is a significant source of slow loading. The async and defer attributes are like nice requests you send to the browser.
- Async: This instructs the browser to download the script in the background as it proceeds to load the rest of the page. The browser will suspend once the script is ready and run it. This is perfect for scripts that don’t rely on other scripts, such as an analytics tracker.
- Defer: This also instructs the browser to download the script in the background but does not run the script until the rest of the page is loaded. This is ideal for scripts that require the rest of the page’s content to be available, such as a script that resizes the page’s layout.
One little modification to your script tag can make a huge difference.
5. Minification and Compression: Squeezing Your Code
Imagine minification and compression as two methods of packing your code tighter. Minification is the removal of all unnecessary characters from your code, such as comments, unnecessary spaces, and line breaks. They serve the developer but are entirely useless to the browser. It is similar to taking a well-written book and reducing it to the text itself, none of the formatting. Compression takes an algorithm such as Gzip or Brotli and compiles your code files into something smaller, just like you zip a folder on your machine.
When applied together, these two methods can significantly minimize the size of your JavaScript file, in some cases up to 70%, making browsers download it much quicker. This is an important step in any attempt to remove unused JavaScript and optimize your website.
6. Tree Shaking: The Digital Gardener
Suppose you have a massive library of functions, yet your website makes use of just a few of them. “Tree shaking” is a method employed by today’s build tools (such as Webpack) to automatically strip out the unused code from your final bundle. It’s similar to having a digital gardener trim out the unnecessary branches on your tree of code, so that only the healthy, working pieces are left. It’s a great way to automatically remove unused JavaScript you may not even be aware is present. It works particularly well when you’re using big third-party libraries.
7. Audit Your Plugins and Themes: Less is More
At times, the best things in life really are simple. The majority of websites, particularly those on sites such as WordPress, have themes and plugins that include a whole lot of unnecessary baggage. A plugin may contain a whole library of code for something you don’t even have implemented. Auditing your plugins and themes on a regular basis is a requirement. If you have a plugin that you no longer use, or a theme with functions you don’t want, uninstall it. You’d be amazed at how much dead weight can be cut this way. Just don’t forget to back up your site first before uninstalling anything!
8. Manual De-queuing and De-registering
For those with a bit more technical know-how, an effective means of remove unused JavaScript is to de-queue or de-register it manually. This is standard practice on sites like WordPress where plugins tend to load scripts on every single page, even though they’re only required on one. For instance, a contact form plugin might load its script on your homepage, blog, and product pages, despite the form only being present on your “Contact Us” page. With a single line of code, you can instruct your site to not load that script on alternate pages, which can save considerable bandwidth and processing.
9. Using a CDN: Getting Your Code in Front of Your Users
A Content Delivery Network, or CDN, is an array of servers dispersed throughout the globe. When someone browses to your site, the content is delivered from the nearest server. This makes your website load in a fraction of the time before. Although a CDN doesn’t explicitly remove unused JavaScript, it speeds up delivery of your website’s files so quickly that it can have the appearance of having been optimized. It’s an excellent supporting tactic to the remaining tips on this list.
10. Keep Current and Track Performance
Your website isn’t a “set it and forget it” kind of thing. The internet keeps changing, and your site should grow with it. That’s why it’s important to regularly check how well your site is performing. You can use free tools like Google Lighthouse, GTmetrix, or WebPageTest to do this. These tools give you detailed reports and helpful tips, like pointing out to remove unused JavaScript that might be slowing things down.
By making performance checks a regular part of your website maintenance, you’ll keep your site fast, clean, and ready for whatever comes next. It is like giving your site a regular health check to make sure it’s always in top shape.
Common Optimization Methods to Improve Website Performance
Wrapping up!
By following these simple steps, you can remove unused JavaScript and change your website speed. You can free up your site from that clunky experience into a fast, responsive, and delightful one. A faster website will keep your visitors happy and will improve your search engine rankings. It will help you to achieve your business goals. So go ahead, give your website the spring cleaning it deserves!
To learn more, visit KnowledgeNile!
FAQs
1. What is unused JavaScript?
Answer: Unused JavaScript is an additional code on your website that actually does nothing. It simply exists on your website and slows down the speed of the site.
2. Does deleting unused JavaScript break my website?
Answer: No, removing the wrong code can create problems, but if you only delete those scripts that are not in use, it will help your site perform better and load faster.
Recommended For You:

Stephan is the sports journalist for the Maple Grove Report.