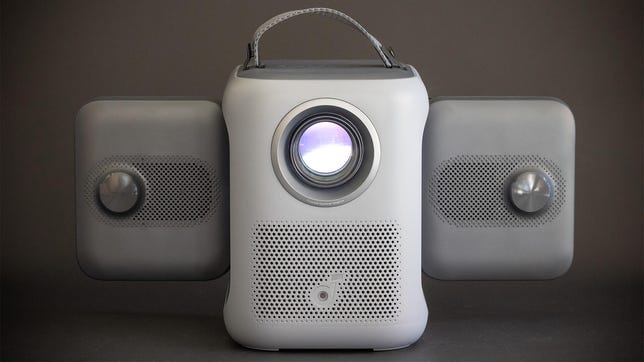
The Soundcore Nebula P1i has speakers that fold out and rotate. They look a lot like little elephant ears. They’re also gray. So if you add a trunk and a second eyeball — and you squint a lot — then it’s sort of a mini robot elephant. It’s actually a projector, of course, and a budget one at that.
What’s most impressive beyond the adorable and functional “ears” is the fact that the P1i performs far better than you’d expect for a projector that includes Google TV and costs less than $400. It has a simplistic lens that requires it to be positioned at roughly midpoint of the image it is projecting (no upward throw), but as long as you don’t mind that, a trapezoidal image or a bit of keystone correction, this is a great budget projector.
Specs and such
Resolution: 1080p
Lumens spec: 380 (ANSI)
Zoom: No
Lens shift: No
Light source type: LED
To avoid confusion, a quick explanation about naming. Parent company Anker seems to hate the name Anker and has numerous subbrands, but also, they drop and combine subbrands regularly. So the Nebula subbrand has been absorbed into Soundcore, the subbrand famous for quite decent Bluetooth headphones and speakers. It’s an odd pairing in my mind, but what do I know? So you can alternately call this the Anker Soundcore Nebula P1i or the Soundcore Nebula P1i by Anker. That’s a mouthful. Also, apparently the “S” is lowercase in their branding, but no, sorry, that’s a bridge too far.
The P1i has 1080p resolution, quite a step up from the 720p that was common in budget projectors not too long ago. Unless you’re sitting exceptionally close to a normal-sized image or trying to project an abnormally huge image, this resolution is more than enough — you’re not going to see pixels.
Geoffrey Morrison/CNET
Soundcore claims a light output of 380 ANSI lumens. I measured 382 in its most accurate mode. That is, I think, the closest a company’s claims have ever been to my real-world measurements. Usually they’re more… let’s say “optimistic.” Even more impressive is the P1i is actually capable of even more. In the least accurate Conference mode, it’s capable of 603 lumens. That’s quite good for an inexpensive projector, brighter than many portables and not far off something like the Epson Flex Plus, which I measured as 655 in its most accurate mode, though a far brighter 817 in its brightest.
The biggest issue with the P1i is the lens, in that it’s a simple design similar to other budget projectors like the TCL A1 and Vimgo P10. While there are benefits, not least reduced cost, the drawback is no upward throw. The vast majority of projectors create an image that’s slightly above its lens. This allows for coffee-table placement or mounting on a ceiling, and the projected image appears somewhere near the middle of the wall.
The P1i, instead, projects its image straight out the front. The middle of the lens is basically the middle of the image. It’s rare that anyone would mount a projector around four feet in the air to project on the middle of a wall, so if you place it on a low-slung table this gives you two choices: The easiest is just dealing with a trapezoidal image, but almost as easy is using the P1i’s built-in keystone correction. This isn’t ideal because it’s only using a portion of the imaging chip, so you’re losing resolution and brightness as well as potentially adding some artifacts. For a $370 projector, this isn’t a huge deal, but it’s worth keeping in mind.
Connections
HDMI inputs: 1
USB port: 1 USB-A
Audio output: 3.5mm headphone, Bluetooth
Internet: Wi-Fi
Streaming interface: Google TV
Remote: Backlit
The main attraction of the P1i is the adjustable speakers. For a projector that’s clearly intended for use in impromptu spaces, this seems like a great idea. People might be gathered around in front, beside, behind or all of these. Many small projectors only have speakers facing one direction, maybe two, and if they’re not facing you, the sound is often quieter or more muffled. The P1i’s speakers can rotate out 90 degrees so they’re facing backward, and then they can rotate so they face forward or up. They’re independent, so one can face one direction and the other in a different direction. It’s a clever idea that I imagine a lot of people will use.
Geoffrey Morrison/CNET
Each speaker has 10 watts of power at its disposal, so they can play fairly loud. However, the sound is rather thin, without much bass even graded on the curve of small drivers in a small box. While the audience is more likely to hear what’s going on with the P1i compared to some portable speakers, they’re not going to be overwhelmed with the sound quality. Fair, perhaps, given the price, but as you’ll read in the next section, the price isn’t a totally valid excuse.
The streaming interface is Google TV, like nearly all modern projectors. It’s slick enough in daily use and gives you access to all the major streaming services and countless minor ones, too. If you want to connect a gaming console or your own streaming stick, like Roku or Amazon, there’s an HDMI input on the back. Curiously, the 3.5mm audio output is labeled AUX, implying a line-level input, but it’s a headphone output.
The most logical competitor to the P1i I’ve reviewed recently is TCL’s A1. This is also a budget projector with built-in streaming. It also has a simple lens, so no upward throw. Pricing at launch was a lot more expensive, $500 to the P1i’s $370, but currently the A1 is cheaper just about everywhere. I compared them both side by side on a 1.0-gain screen.
Geoffrey Morrison/CNET
Physically, the P1i is larger, roughly twice the overall volume of the A1. Its gray-on-gray exterior uses cheaper-looking plastic with none of the A1’s classy design. While the A1’s has a handle, which can double as a stand, it’s the P1i’s rotating ears which steals the show. Being able to direct sound directly at the audience is an absolute boon for a low-power sound system. That’s not to say the P1i sounds better, exactly. The A1 has a fuller sound with better bass. The P1i has a little clearer treble. So I’d say the A1 has a slight edge in sound quality, but the P1i is far more versatile and will be better heard by more people sitting around the projector.
In their regular modes, both the Anker and the TCL have similar brightness. I measured 382 and 433 lumens respectively. That’s not enough of a difference to notice. However, you can get more light from the Anker using the less accurate Standard mode, which is only slightly cooler/bluer than the Movie mode. This results in a roughly 45% increase in brightness, which is noticeable, and likely the mode most people will use. However, there’s also a lot more fan noise compared to the dimmer mode or the TCL A1. A low noise mode reduces the fans but also the brightness, and this is back down to roughly the same brightness as the A1.
In terms of contrast ratio, the A1 is definitely better, with an as-measured 2,522:1 to the P1i’s still-decent 826:1. So the darkest parts of the A1’s image look less gray, but given the greater light output of the P1i, this is less of a factor than if they had the same brightness. Contrast ratio is great, and generally the most important aspect of a display’s performance, but the additional light output is more practical since you can create a bigger image that’s still watchable.
Geoffrey Morrison/CNET
Color is probably the biggest difference between the two. The P1i’s color is more saturated and more accurate than the more washed-out colors of the A1. Grass is greener; reds are richer and deeper. After the overall brightness, the color difference is what’s most noticeable. The A1 is fine for the price, but in terms of color, the P1i looks like a more expensive projector.
The TCL A1 wins on aesthetics and, slightly, sound quality. The P1i, however, creates a better image than its price implies and the rotating speakers are likely far more useful in a wider variety of situations. There are two other options that aren’t direct competitors but are worth considering. Both Anker’s own Mars 3 Air and TCL’s PlayCube are roughly twice the price of the P1, but both are smaller and have built-in batteries. If portability is your main goal, those are worth checking out.
It’s all in the ears
Geoffrey Morrison/CNET
Soundcore (nee Nebula, nee Anker) has designed some real oddball projectors recently, and to be honest, I’m here for it. I’ve been reviewing projectors for a very long time, and it’s refreshing to see companies try different things.
The P1i is one of the best budget options I’ve seen for the occasional movie night or wall-sized gaming session. I think the price is great, especially considering you get Google TV streaming, a rarity at that price not long ago. Performance, overall, is better than you’d expect for one of the least expensive projectors I’ve ever reviewed.
My only issue is the lack of upward throw, which basically requires you to use keystone correction if you don’t place it pretty high off the floor. This isn’t a huge issue, especially since I doubt anyone buying a sub-$400 projector is expecting a perfect image. Overall, the image is better than the price implies, so if it’s a bit trapezoidal, so be it.
Apache Spark is a lightweight open-source framework that handles the real-time generated data. It was designed to make fast computations based on Hadoop MapReduce. In other words Apache spark was developed for speeding up the Hadoop computing process. MapReduce model was extended by Apache Spark to use it more efficiently for computations that include stream processing and interactive queries. In-Memory cluster computing increases the processing speed of the application which was the main feature of Spark. Apache Spark covers a wide range of workloads such as iterative algorithms,interactive queries,batch applications and streaming. Along with all these workloads, it reduces the burden to the management for maintaining separate tools.
Apache Spark History:
In 2009, Matei Zaharia developed Spark as one of Hadoop’s sub-projects in UC Berkeley’s Lab. Under a BSD license, it was open-sourced in 2010. After that, Spark was donated to Apache software foundation in 2013.Now it has emerged as a top-level Apache project.
Why should you learn Apache Spark?
The data that is being generated is increasing day by day.The traditional methods cannot access this huge volume of data. To eliminate this problem, Big data and Hadoop emerged. But they too had some limitations.These limitations can be eliminated by Apache spark. So Apache Spark has become more efficient because of its speed and less complexity.
Spark toolset is continuously expanding, which is attracting third-party interest. So boost your career by learning Apache spark from this Apache Spark Tutorial. Here you can write the applications in any of the programming languages like Java,Python, R, Scala that you are comfortable with. Moreover, Spark developers were paid high salaries.
Step 1: Before installing Apache Spark, we need to verify if Java was installed or not.If Java is already installed, proceed with the next step; otherwise, Download Java and install it on your system.
Step 2: Then Verify if Scala is installed in your system. If it is already installed, then proceed; otherwise, download Scala’s latest version and install it in your system.
Step 3: Now, Download the latest version of Apache Spark from the following Link.
https://spark.apache.org/downloads.html
You can see the Spark Zip file in your download folder.
Step 4: Extract it. Then create a folder named Spark under user Directory and copy-paste the content from the unzipped file.
Step 5: Now, we need to configure the path.
Go to Control Panel -> System and Security -> System -> Advanced Settings -> Environment Variables
Add new user variable (or System variable)
(To add a new user variable, click on the New button under User variable for )
Then click OK.
Now, Add %SPARK_HOME%\bin to the path variable.
And Click OK.
Step 6: Spark needs Hadoop to run.For Hadoop 2.7,you need to install winutils.exe.
You can find winutils.exe from the following link. Download it
Step 7: Create a folder named winutils in the C drive and create a folder named bin inside. Move the downloaded winutils file to the bin folder.
C:\winutils\bin
Now add the user (or system) variable %HADOOP_HOME% like SPARK_HOME.
And Click OK. This step completes spark installation.
Apache Spark Certification Training
Master Your Craft
Lifetime LMS & Faculty Access
24/7 online expert support
Real-world & Project Based Learning
Spark Architecture:
Apache Spark Architecture is a well-defined and layered architecture, where all the layers and components are loosely coupled. This Architecture is integrated with various libraries and extensions. In other words, it is said that Spark Architecture follows Master-Slave architecture, where a cluster consists of a single master and multiple workers nodes.
Apache Spark architecture mainly depends upon two abstractions:
1. Directed Acyclic Graph (DAG): Directed Acyclic Graph is a sequence of computations performed on data. Here each node is an RDD partition, and each edge is a transformation on top of data. DAG eliminates the Hadoop MapReduce multistage execution model and provides performance enhancements over Hadoop.
Let us understand it more clearly.
Here the Driver Program runs the main() function of the application.It creates a SparkContext object whose primary purpose is to run as an independent set of processes on the cluster and coordinate with the spark applications. So to run on a cluster, SparkContext connects with different cluster managers. Then it acquires executors on nodes in the cluster and sends the application code to the executors. Here the application code can be defined by Python or JAR files. Finally, the SparkContext sends the tasks to the executors to run.
2. Resilient Distributed Dataset (RDD):
Resilient Distributed Datasets are the collection of data items that are split into different partitions and stored in the memory of the spark cluster’s worker nodes.
RDD’s can be created in two ways:
By Parallelizing existing data in the driver program and
By referencing a dataset in the external storage system
Parallelized Collection: Parallelized collections are created by calling the SparkContext’s parallelize method on an existing driver program collection. The elements of the collection are copied to form a distributed dataset that can be operated in parallel.
Here is an example of how to create a parallized collection holding the numbers 1 to 3.
val info = Array(1, 2, 3)
val distnumbr = sc.parallelize(numbr)
External Datasets: From any storage sources supported by Hadoop such as HDFS, HBase, Cassandra, or even the local file system, distributed datasets can be created. Spark supports text files, Sequence Files, and any other Hadoop InputFormat.
To create RDD’s text file, SparkContext’s textfile method can be used. URI for the file is taken by this method, either a hdfs:// or a local path on the machine, and reads the file’s data.
Example invocation:
scala> val distFile = sc.textFile("data.txt")
distFile: org.apache.spark.rdd.RDD[String] = data.txt MapPartitionsRDD[10] at textFile at :26
distFile can be acted on by dataset operations once it is created. For example, Sizes of all the lines can be added using map and reduce operations.
distFile.map(s => s.length).reduce((a, b) => a + b).
RDD Operations: RDD provides two types of Operations. They are:
i) Transformation:
In Spark, the role of Transformation is to create a new dataset from an existing one. As they are computed when an action requires a result to be returned to the driver program, the transformations are considered lazy.
Some of the RDD transformations that are frequently used are:
map(func) – It returns a new distributed dataset formed by passing each element of the source through the function func.
filter(func) – It returns a new dataset formed by selecting those elements of the source on which func returns true.
flatMap(func) – It is similar to map, but each input item can be mapped to 0 or more output items. (Therefore, func should return a Sequence rather than a single item).
mapPartitions(func) – It is similar to map, but runs separately on each partition (block) of the RDD. Therefore func must be of type Iterator => Iterator while running on an RDD of type T.
mapPartitionsWithIndex(func) – It is similar to mapPartitions, but it also provides func with an integer value representing the partition index. So func must be of type (Int, Iterator) => Iterator while running on an RDD of type T.
sample(withReplacement, fraction, seed) – Using a given random number generator seed, It samples a fraction fraction of the data, with or without replacement.
union(otherDataset) – It Returns a new dataset that contains the union of the elements in the source dataset and the argument.
intersection(otherDataset) – It returns a new RDD that contains the intersection of elements in the source dataset and the argument.
distinct([numPartitions])) – It returns a new dataset that contains the distinct elements of the source dataset.
groupByKey([numPartitions]) – When called on a dataset of (K, V) pairs, it returns a dataset of (K, Iterable) pairs. Using reduceByKey or aggregateByKey will yield much better performance if you are grouping in order to perform an aggregation (such as a sum or average) over each key. To set a different number of tasks, You can pass an optional numPartitions argument.
reduceByKey(func, [numPartitions]) – When called on a dataset of (K, V) pairs, it returns a dataset of (K, V) pairs where the values for each key are aggregated using the given reduce function func which must be of type (V,V) => V.
aggregateByKey(zeroValue)(seqOp, combOp, [numPartitions]) – When called on a dataset of (K, V) pairs, it returns a dataset of (K, U) pairs where the values for each key are aggregated using the given combine functions and a neutral “zero” value.
sortByKey([ascending], [numPartitions]) – When called on a dataset of (K, V) pairs where K implements Ordered, it returns a dataset of (K, V) pairs sorted by keys in ascending or descending order as specified in the boolean ascending argument.
join(otherDataset, [numPartitions]) – When called on datasets of type (K, V) and (K, W), it returns a dataset of (K, (V, W)) pairs with all pairs of elements for each key. Outer joins are supported through rightOuterJoin, leftOuterJoin and fullOuterJoin.
cogroup(otherDataset, [numPartitions]) – When called on datasets of type (K, V) and (K, W), it returns a dataset of (K, (Iterable, Iterable)) tuples.
cartesian(otherDataset) – When called on datasets of types T and U, it returns a dataset of (T, U) pairs (all pairs of elements).
pipe(command, [envVars]) – It pipes each partition of the RDD through a shell command, e.g., a bash or Perl script.
coalesce(numPartitions) – It decreases the number of partitions in the RDD to numPartitions.
repartition(numPartitions) – It reshuffles the RDD data randomly to create either more or fewer partitions and balances it across them.
repartitionAndSortWithinPartitions(partitioner) – It repartitions the RDD according to the given partitioner and, within each resulting partition, sort records by their keys.
ii) Action:
In Spark,the role of action is to return a value to your driver program after running a computation on the dataset.
Some of the RDD actions that are frequently used are:
reduce(func) -It aggregates the elements of the dataset using a function func that takes two arguments and returns one. In order to compute it correctly in parallel, the function should be commutative and associative.
collect() – At the driver program, it returns all the elements of the dataset as an array. This is usually useful either after a filter or other operation that returns a small subset of the data.
count() – It returns the number of elements in the dataset.
first() – It returns the first element of the dataset.
take(r) – It returns an array with the first r elements of the dataset.
takeSample(withReplacement, num, [seed]) – It returns an array with a random sample of num elements of the dataset, with or without replacement.
takeOrdered(r, [ordering]) – It returns the first r elements of the RDD using either their natural order or a custom comparator.
saveAsTextFile(path) – It is used to write the dataset elements as a text file in a given directory in the local filesystem, HDFS, or any other Hadoop-supported file system. To convert it to a line of text in the file, Spark calls toString on each element.
saveAsSequenceFile(path) – It is used to write the dataset elements as a Hadoop SequenceFile in the given path in a local filesystem, HDFS or any other Hadoop-supported file system.
saveAsObjectFile(path) – It is used to write the dataset elements in a simple format using Java serialization, which can then be loaded using SparkContext.objectFile().
countByKey() – It is available only on RDDs of type (K, V). It returns a hashmap of (K, Int) pairs with the count of each key.
foreach(func) – It runs a function func on all the dataset elements for side effects such as updating an Accumulator or interacting with external storage systems.
Subscribe to our YouTube channel to get new updates..!
RDD Persistence: One of the important capabilities Spark provides is persisting a dataset in memory across operations. While persisting an RDD, each node stores in memory any partition of it that it computes and reuses in other actions on that dataset. This makes the future actions much faster. persist() or cache() methods can be used to mark an RDD to be persisted. Cache() is considered as fault-tolerant. It means, if any partition is lost, it will be recomputed automatically using the transformations that were originally created. There are different storage levels to store persisted RDD’s. These Storage levels are set by passing a StorageLevel object(Scala, Java, Python) to persist(). While the Cache() method is used for the default storage level StorageLevel.MEMORY_ONLY.
Set of Storage Levels are as follows:
MEMORY_ONLY – It is the default level that stores the RDD as deserialized Java objects in the JVM. If the RDD doesn’t fit in memory, some of the partitions will not be cached and recomputed whenever they’re needed.
MEMORY_AND_DISK – RDD is stored as deserialized Java objects in the JVM. If the RDD doesn’t fit in memory, it stores the partitions on the disk and reads them from there when they’re needed.
MEMORY_ONLY_SER – It stores RDD as serialized Java objects( i.e., per partition, one-byte array). It is generally more space-efficient than deserialized objects.
MEMORY_AND_DISK_SER – It is similar to MEMORY_ONLY_SER but split partitions that don’t fit in memory to disk instead of recomputing them.
DISK_ONLY – It stores the RDD partitions only on disk.
MEMORY_ONLY_2, MEMORY_AND_DISK_2 – It is the same as the levels above but replicates each partition on two cluster nodes.
OFF_HEAP (experimental) – It is similar to MEMORY_ONLY_SER but stores the data in off-heap memory.
RDD Shared Variables: Whenever a function is passed to a Spark operation, it is executed on a remote cluster node and works on separate copies of all the function variables. These variables are copied to each machine, and no updates of the variables on the remote machine are propagated back to the driver program.
Spark provides two limited types of variables: Broadcast variables and accumulators.
i) Broadcast variable: Broadcast variables allow the programmer to keep a read-only variable cached on each machine rather than providing a copy of it with tasks. To reduce communication costs, Spark attempts to distribute broadcast variables using efficient broadcast algorithms. Through a set of stages, Spark actions are executed, separated by distributed “shuffle” operations. Spark broadcasts the common data required by the tasks within each stage automatically. The data broadcasted in this way is cached in serialized form and deserialized before running the task.
Broadcast variable v is created using call SparkContext.broadcast(v).
scala> val v = sc.broadcast(Array(1, 2, 3))
scala> v.value
ii) Accumulators: Accumulator is a variable that is used to perform associative and commutative operations such as sums or counters. Numeric type accumulators are supported by Spark. To create a numeric accumulator value of Long or Double type, use SparkContext.longAccumulator() or SparkContext.doubleAccumulator()
scala> val a=sc.longAccumulator("Accumulator")
scala> sc.parallelize(Array(2,5)).foreach(x=>a.add(x))
scala> a.value
Apache Spark Certification Training
Weekday / Weekend Batches
Spark Components:
Spark Project consists of different components that are tightly integrated.To its core, It is a computational engine that can distribute, monitor, and schedule multiple applications.
Spark Core: It is the heart of Apache Spark that performs the core functionality. It holds the components for task scheduling, interacting with storage systems, fault recovery, and memory management.
Spark SQL: On the top of Spark Core, Spark SQL is built, supporting structured data. Spark SQL allows querying the data using SQL(Structured Query Language) and HQL(Hive Query Language). It also supports data sources like JSON, Hive tables, and Parquet. Spark SQL also supports JDBC and ODBC connections.
Spark Streaming: It supports Scalable and faults tolerant processing of streaming data. To perform streaming analytics, it uses Spark Core’s fast scheduling capability. It performs RDD transformations on the data by accepting data in mini-batches. Its design ensures that the applications written for streaming data can be reused with little modifications.
MLib: It is a Machine Learning Library which consists of various machine learning algorithms. They include hypothesis and correlation testing, regression and classification, clustering, and principal component analysis.
GraphX: It is a Library which is used to manipulate graphs and perform graph-parallel computations. It facilitates creating a directed graph with arbitrary properties that are attached to each vertex and edge. It also supports various operations like subgraph, joins vertices, and aggregate messages to manipulate the graph.
Apache Spark Compatibility with Hadoop:
Spark cannot replace Hadoop, but it influences the functionality of Hadoop. From the beginning, Spark reads data from and can write data to Hadoop Distributed File System(HDFS). We can say that Apache Spark is a Hadoop-based data processing engine which can take over batch and streaming overheads. So running Spark over Hadoop provides more enhanced functionality.
We can use Spark over Hadoop in 3 ways: Standalone, YARN, SIMR
In Standalone mode, We can allocate resources on all the machines or on a subset of machines in the Hadoop cluster. We can also run Spark side by side with Hadoop MapReduce.
Without any prerequisites we can run Spark on YARN. Spark in Hadoop stack can be integrated and use the facilities and advantages of Spark.
With Spark in MapReduce(SIMR), we can use Spark Shell in a few minutes after downloading. Hence it reduces the overhead of Deployment.
Apache Spark Uses:
Spark provides high performance for both batch data and streaming data. It is an easy to use application which provides a collection of libraries. Moreover the following are the uses of Apache Spark:
Data Integration
StreamProcessing
Machine Learning
Interactive Analysis
Related Article What is Apache Spark !
Conclusion: There is a good demand for the expert professionals in this field. Hope this tutorial helped you in learning Apache Spark. In this tutorial, we have covered all the topics that are required to enhance your professionals skills in Apache Spark.
Apache Certification Tutorial
Apache Web Server is open-source web server creation, arrangement and the board programming. At first created by a gathering of programming developers, it is presently kept up by the Apache Software Foundation. Apache Web Server is intended to make web servers that can have at least one HTTP-based site. Prominent highlights incorporate the capacity to help different programming language, server-side scripting, a validation component and database bolster.
Apache web server is utilized for facilitating sites. It is an amazing web server and has a ton of points of interest when contrasted with other web servers. You can utilize it in the two windows and Linux servers. With LAMP condition, you can setup sites and host it on your server.
Apache is a well known open-source, cross-stage web server that is, by the numbers, the most prominent web server in presence. It’s effectively kept up by the Apache Software Foundation.
Notwithstanding its fame, it’s additionally one of the most established web servers, with its first discharge the distance in 1995. Numerous panels have use Apache today. Like other web servers, Apache controls the off camera parts of serving your site’s records to guests.
Become a Apache Ambari Certified professional by learning this HKRApache Ambari Training!
To provide the best experiences, we use technologies like cookies to store and/or access device information. Consenting to these technologies will allow us to process data such as browsing behavior or unique IDs on this site. Not consenting or withdrawing consent, may adversely affect certain features and functions.
Functional
Always active
The technical storage or access is strictly necessary for the legitimate purpose of enabling the use of a specific service explicitly requested by the subscriber or user, or for the sole purpose of carrying out the transmission of a communication over an electronic communications network.
Preferences
The technical storage or access is necessary for the legitimate purpose of storing preferences that are not requested by the subscriber or user.
Statistics
The technical storage or access that is used exclusively for statistical purposes.The technical storage or access that is used exclusively for anonymous statistical purposes. Without a subpoena, voluntary compliance on the part of your Internet Service Provider, or additional records from a third party, information stored or retrieved for this purpose alone cannot usually be used to identify you.
Marketing
The technical storage or access is required to create user profiles to send advertising, or to track the user on a website or across several websites for similar marketing purposes.