Expert-Approved Ways to Use Your LED Mask to Get Max Results


Red light therapy face masks are all the rage thanks to beauty and wellness influencers on social media. Also known as LED masks, they use red, near-infrared or blue light at different wavelengths with claims that they can improve your skin’s appearance, boost collagen production and, if they have blue light, target acne. 

The best part is that you can use these masks at home without setting foot in an aesthetician’s office. However, these LED masks aren’t cheap and only some are FDA-cleared, while others aren’t. 

If you’re going to invest in an LED mask, it’s important to know how to use it correctly and what to look for when choosing the best one for your needs. I spoke with a dermatologist and plastic surgeon to learn the best way to use your LED light therapy mask, as well as any risks and benefits to consider.

Where to include an LED mask in your skin care routine

Woman wearing a white robe rubbing skin care into her cheeks

When you use red light therapy during your skin care regimen is important to get the best results.

GaudiLab/Shutterstock

A skin care routine usually includes serums, creams, ointments and other topical products targeting your skin’s needs. If you’re using an LED mask, it’s important to know the best placement in your routine to get the most out of it. 

Dr. Eleonora Fedonenko, the medical director and a dermatologist at Your Laser Skin Care in Los Angeles, told CNET that she recommends starting any LED mask treatment on a clean face, free of creams and serums. “If there is residue from makeup or sunscreen, it can block the light from getting to the skin and reduce the effectiveness of the session,” Fedonenko said. 

Important considerations

When choosing an LED therapy mask, it’s important to opt for one that has FDA clearance, as this indicates the product has been tested for safety and efficacy. Fedonenko also recommends researching the company and verifying that it has done clinical studies regarding the wavelengths used. 

“Red light should be between 630 and 660 nanometers, and near-infrared light should be between 830 and 850 nanometers since they’re the two wavelengths most commonly shown to promote collagen growth while reducing inflammation,” Fedonenko explains. 

You’ll also want to make sure that the mask fits your face properly and evenly distributes the light across your skin for the best results. Some models CNET recommends: Shark CryoGlow LED Face Mask, RENPHO Artemis LED face mask and Omnilux Contour Face.

How often to use your LED mask

Woman wearing a robe and hair tied in towel holding a red light therapy mask

Using a red light therapy mask a few times a week should be enough to see improvement in your skin.

Anton Vierietin/ Shutterstock

Knowing how often to use an LED therapy mask is important since you don’t want to overdo it. Fedonenko recommends aiming for 10- to 20-minute treatments, three to five times per week. 

“There is a timing that is correct depending on the power output of the device. For example, 10 minutes may suffice with a high-output irradiance mask and more with a low-output mask,” Fedonenko says. Irradiance refers to the amount of light reaching the skin.

Dr. Amy Bandy, a board-certified plastic and reconstructive surgeon, recommends an at-home red light therapy mask with an irradiance of approximately 20 to 50 milliwatts per square centimeter, stating, “This level of irradiance has been shown to be sufficient to deliver measurable results from home use while providing comfort and safety.”

Fedonenko notes that FDA-cleared devices usually have an irradiance of at least 30 mW/cm2. Try to avoid masks with light levels between 10-30 mW/cm2, because even though the light penetrates the skin, Fedonenko says it’s not strong enough to yield results, as it elicits little measurable cellular response.

Use caution with masks with irradiance levels above 100 mW/cm2, as these tend to be too strong, especially if you switch from a lower-intensity version. Fodenenko says,” Many of my patients have come to me with redness that continues due to their change from a lower-powered device to a higher-powered one, with the output being the cause and not due to frequency used.”

Fodenenko warns against using your LED mask daily because some people think doing more will speed up the process, when it can have the opposite effect. “Patients have come in with skin that was so tight and raw, they were using the mask every day in order to speed up their results,” Fedonenko says. Instead, it’s important to give your skin time to recover between red light therapy treatments because the light stimulates cellular repair. 

Bandy agrees and says that frequent use and strong products can also cause damage. “If someone is treating themselves too frequently and/or simultaneously utilizing very harsh skin care products such as retinoids or exfoliating acids, the skin barrier may become damaged, which leads to further inflammation and irritation,” Bandy says. 

However, it’s common for the skin to have some redness, dryness, itchiness or tightness when using an LED mask. If these symptoms don’t subside or get worse after a treatment, it’s best to seek medical guidance. 

Precautions to take with LED masks

Asian woman looking at redness on her face in a mirror

Be mindful of the type of red light therapy mask you’re using because it can cause other skin issues if it isn’t the right fit.

shisu_ka/ Shutterstock

One thing people may not consider with LED therapy masks is that the eyes need protection. 

“The masks are worn near the face, and wearing them without goggles for long periods of time can cause eye fatigue,” Bandy says. 

This is because the mask can cause light-induced headaches in those sensitive to light or those with certain eye conditions. It’s something to keep in mind if you have sensitive eyes or ocular conditions.

Fortunately, many LED masks have built-in goggles, so you should think twice before purchasing one that doesn’t. You should also ensure this part of the mask fits correctly before turning it on. If you still end up with a headache or sensitivity, stop using the mask.

Other non-eye-related signs you should take a break include peeling or acne on areas of the skin where you don’t normally experience breakouts or flaking. “Slow down the number of sessions and allow your skin time to heal,” Bandy says.

Signs the LED mask is working

If you’re new to using an LED mask, there are some ways to tell if it’s working on your skin. In general, you may start to see improvements within a few weeks. “These improvements include reduced inflammation, improved brightness and clarity of their skin and a better overall complexion,” Bandy says. 

Smoother skin and reduced fine lines are common weeks after using an LED therapy mask because light therapy stimulates collagen production. Acne sufferers may notice fewer breakouts and improvement in hyperpigmentation. Those with rosacea or who deal with redness will notice their skin start to calm down. ”That’s surprising to them as they came in with the idea that they were there for skin aging concerns,” Fodonenko says. 

However, if it’s been eight weeks and you notice no difference in your skin, Fodonenko says the device’s irradiance output may be the issue, so you may want to replace your current model with one that has a higher irradiance. 

The verdict on LED masks

As with any product, you find yourself influenced to buy on social media, it’s still important to approach these trends with precaution. If you’re interested in adding an LED mask to your skin care regimen, make sure you do your research and choose an FDA-cleared product. This reassures you that it’s safe overall and tested for efficacy, so you know you’re getting your money’s worth. 

Remember that it can also take time to see improvements, so if you don’t see results right away, give it several weeks to see any changes. If you notice your skin worsening, stop treatment and seek medical attention for further assistance.


Source link

Leave a Reply

Subscribe to Our Newsletter

Get our latest articles delivered straight to your inbox. No spam, we promise.

Recent Reviews


What is XPath in Selenium – Table of Content

What is XPath in Selenium?

Selenium is an open-source, most popular web automation testing tool that supports multiple browsers & OS. XPath in Selenium is an XML Path and a syntax useful for locating an element on a web page. Locating any element on the web page uses XML path or XPath expression. Further, XPath in Selenium is useful for navigating through the HTML structure of the web page. 

Moreover, XPath uses HTML DOM structure to find any element on a web page for both HTML and XML documents. 

The syntax for XPath In Selenium 

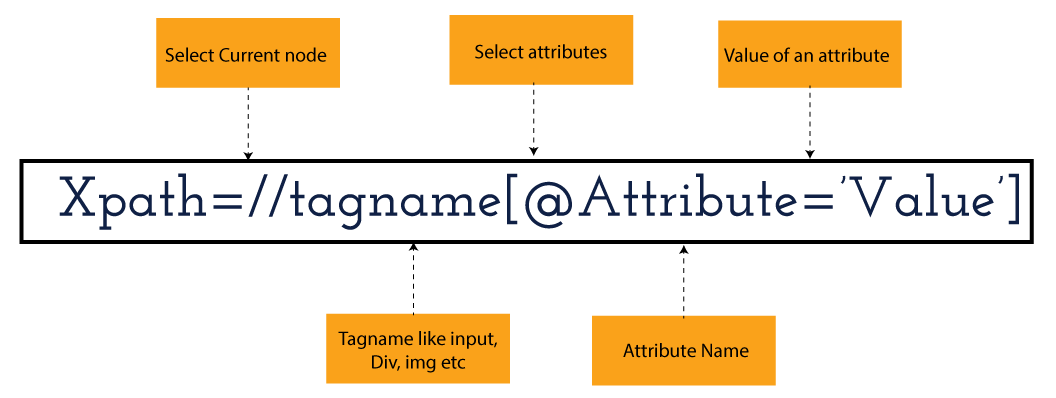
XPath in Selenium holds the element’s location on the web page. The basic syntax for XML Path Selenium is as follows-

Xpath=//tagname[@attribute="value"]

The meaning of each expression in the syntax is-

  • // : Choose the existing node.
  • Tagname: Particular node’s tagname.
  • @: This symbol denotes the “Select” attribute.
  • Attribute: Node’s attribute name.
  • Value: Attribute’s Value.

Become a master of Selenium by going through this HKR Selenium Training!

XML Document

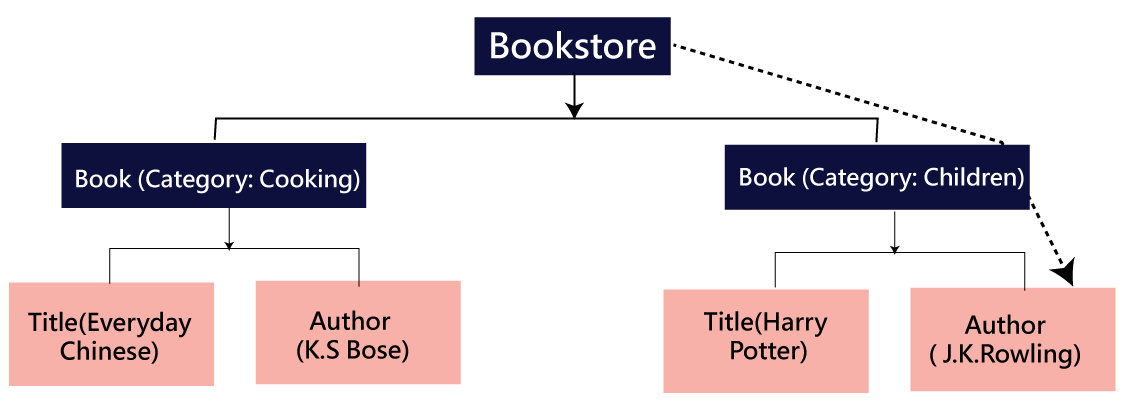
The XML documents are the text files that contain XML data, including elements and other markups, in a sequential package. Further, it can include a wide variety of data such as numbers databases, numbers of a mathematical equation, etc. You can understand XML document with an example:-

 Kumar

   AK & Co.

    032456123

Here, the above code is divided into two parts- Document Prolog & Document Elements. Let us discuss them in brief.

Document Prolog

The document prolog appears at the top of the document, beforE the root document element. It includes XML and Document type declaration. 

Document Elements

These major building blocks of XML segregate the document into different sections. Each of these document sections perform a particular purpose. Moreover, you can easily segregate a document into different sections so that search engines can use it. Further, these document elements can be the containers having text and other elements combined. 

Types of XPath

  1. Absolute XPath:
  2. Relative XPath:
Absolute XPath

In Selenium, the absolute XPath is the direct path to find the element. This Xpath begins with the “/” (Slash) symbol and helps select the element from the root. The major drawback of this XPath is that if you change the path of the element or attribute, the absolute XPath will fail.

Relative XPath:

The Relative XPath in Selenium begins with the double forward slash “//” symbol and from the middle of the HTML DOM. You can search elements anywhere on the web page as it doesn’t need to write a lengthy Xpath. This XPath is mainly considered as it is not a complete path from the root element.

For example: //input[@id=‘ap_email’]

Suppose You launch Google Chrome and navigate to google.com. Then locate the search bar utilising XPath. By analysing the web element there is an input tag and attributes like class and id. Utilise the tag name and given attributes to create XPath that will locate the search bar.

If you want to Explore more about Selenium? then read our updated article – Selenium Tutorial

What-is-xpath-in-Selenium-1

Click the Elements tab and press Ctrl + F to open a search box in chromes developers tool.  Write XPath string selector and it will try to search based on that criteria. In the image given above, it has an input tag.  //input implies tagname. Use the name attribute and pass ‘q’ as its value. It provides XPath expression as shown below:

//input[@name=’q’]

XPath string

It has focused on the element that implies this specific element was located utilising XPath.

If you want to Explore more about Selenium? then read our updated article – Selenium Tutorial!

Check out our Latest Tutorial video. Register Now Selenium Online Course to Become an expert in Selenium.


Acquire Selenium with jenkins certification by enrolling in the HKR Selenium with jenkins Training program in Hyderabad!

Selenium Certification Training

  • Master Your Craft
  • Lifetime LMS & Faculty Access
  • 24/7 online expert support
  • Real-world & Project Based Learning

XPath Functions

Automation utilizing Selenium is unquestionably an incredible innovation which gives numerous approaches to distinguish an article or component on the website page. Be that as it may, in some cases we do deal with issues in recognizing the articles on a page that have similar credits. Some cases can be: components having similar credits and names or with more than one button with similar name and ids. It’s trying to train selenium to distinguish a specific item on a website page and it is the place where XPath functions to serve as the hero. 

Frequently asked Selenium Interview Questions and Answers !!

Types of XPath Functions

Selenium involves different functions. The three of the most broadly utilized functions are given below:

1) Basic XPath

The basic XPath expression selects nodes or a list of many nodes based on various elements or attributes such as ID, Name, ClassName, etc. It selects them from the XML documents. The syntax we can use for the basic XPath is –

Xpath=//input[@name="uid"
2.Contains()

It is a method used in XPath expression when the value of an attribute or element dynamically changes. You can easily find the elements with a partial text using the “Contains” feature in the XPath expression. Now understand this with the below example.:-

Xpath=//*[contains(@type,'sub')]

The above example denotes that the full value of the element type is submitted, but we use the partial text ‘sub’ here to find the element. Thus, in the above example, we tried to find the element by giving a partial text of the attribute “submit”. 

3) Using OR & AND

Here, we use two conditions, first or second condition, among which one condition must be “True” to execute it. This method is still applicable if any one or both conditions are “true”. It means that any conditions should be true to find the element. The expression we can use for this is-

Xpath=//*[@type="submit" or @name="btnReset"]

The above XPath expression will help determine whether a single or both conditions are ‘True’.

Similarly, in the “And” XPath expression, also we use two conditions, but both conditions should be “true” to locate the element. If any one of the conditions becomes “false”, then the expression cannot find the element. The syntax we can use for this function is-

Xpath=//input[@type="submit" and @name="btnLogin"]
4) Xpath Starts-with

The function Xpath-Starts-with() in the Xpath functions is useful to find the element whose attribute value changes in some conditions. Here the value changes with the refresh of the page or by performing dynamic actions on the webpage. In this method, the initial text of the attribute should be in parallel to locate the element whose attribute value changes interactively. 

Further, you can also find the elements whose attribute value doesn’t change or remain static. You can understand this function’s use by the following example:-

Xpath=//label[starts-with(@id,'message')]

The above syntax shows that two different elements start with the initial id “message”. Here, you can use the Xpath-starts with function to check whose attribute value changes or remains static.

Become a master of Selenium by going through this HKR Selenium Training in Delhi!

HKR Trainings Logo

Subscribe to our YouTube channel to get new updates..!

5) XPath Text() Function

In Selenium WebDriver, the function XPath Text() is a built-in function useful to locate elements based on the web element’s text. Using this function, you can find the same text element. Moreover, the elements that you locate must be in a string format.

Xpath=//td[text()='UserID']

Using the above expression having text function, you can locate the element that will show the exact match of the text.

6) XPath axes methods

This method in XPath functions is useful for finding complex or changing elements. However, we can see the following XPath axes methods which we can use:-

  1. a) Following- It is useful to select all the elements in the document of the existing node(). The expression you can use for this method is-
 Xpath=//*[@type="text"]//following::input
  1. b) Ancestor- The ancestor axes method is useful to select all the ancestor elements of the existing node, like parents, grandparents, etc. Here, the expression you can use is-
Xpath=//*[text()='Enterprise Testing']//ancestor::div
  1. c) Child- This axes method selects all the child elements in the documents’ current node. The expression you can use here is-
Xpath=//*[@id='java_technologies']//child::li
  1. d) Preceding- This method helps select the nodes that come before the existing ones. Here is the example expression:-
Xpath=//*[@type="submit"]//preceding::input

The above expression helps to identify all the input elements before the currently given nodes.

  1. e) Following-sibling- This method helps to select the following siblings of the existing node. All the siblings will be equivalent to the existing node, and the method will find the sibling next to the existing node. Moreover, the syntax you can use here for this method is-
xpath=//*[@type="submit"]//following-sibling::input
  1. f) Parent- It helps to select the parent from the existing node of the element. The following is the syntax you can use here.
Xpath=//*[@id='rt-feature']//parent::div

Many div(s) match with the parent, but if you want to focus on a specific element. For this you can use the below xpath syntax-

Xpath=//*[@id='rt-feature']//parent::div[1]
  1. g) Self- In this method, it selects the existing node where it selects itself only. That means the node here is the “self”. The expression you can use for self is-
Xpath =//*[@type="password"]//self::input
  1. h) Descendant- It helps to select the descendants of the existing element where it recognizes all the element descendants of the existing element. 
Xpath=//*[@id='rt-feature']//descendant::a

Selenium Certification Training

Weekday / Weekend Batches

Conclusion

XPath or an XML Path is used to locate any element or navigate through the HTML structure of a webpage. It is generally used for automation purposes and in cases where it is difficult to find elements using locators like name, class, ID, etc. However, it is the most important among the locators useful in Selenium to identify web elements. Also, it is a handy locator for the testers of web pages.

Thus, learning about XPath in Selenium will help you quickly identify a web element on a web page. 

Related Articles:


Source link