How to use 100,000 Chase points for 4 round-trip Hawaii flights


To celebrate the 100,000 bonus point welcome offer after you spend $5,000 on purchases in the first three months from account opening on the Chase Sapphire Preferred® Card (see rates and fees), we are showing some of the best and easiest ways you can maximize this limited-time offer.

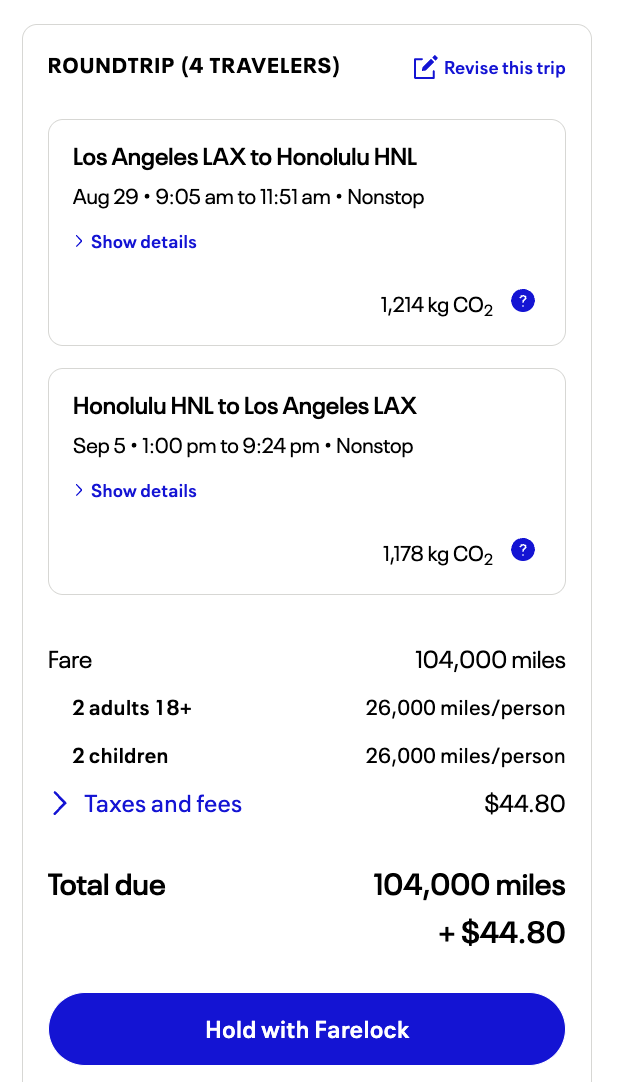
How does four round-trip flights to Hawaii for a total of just $44.80 plus Chase points sound?

Here’s the secret to this great deal: transfer your Chase Ultimate Rewards points to United’s MileagePlus program.

The redemption: 4 round-trip tickets to Hawaii from 104,000 points

At a glance: United Economy class to Hawaii via United

United MileagePlus (1:1 transfer from Chase Ultimate Rewards)

From 26,000 per person plus $11.20 in taxes and fees

1.75 cents per point

Good, search on the United website

Anyone looking to book round-trip flights to Hawaii with one card’s welcome bonus

MileagePlus offers the following great deals to Hawaii (one-way, per person, plus just $5.60 in taxes and fees):

  • Los Angeles International Airport (LAX) to Honolulu’s Daniel K. Inouye International Airport (HNL) from 13,000 Chase points;
  • LAX to Ellison Onizuka Kona International Airport (KOA) from 15,000 Chase points;
  • LAX to Lihue Airport (LIH) from 15,000 Chase points;
  • San Francisco International Airport (SFO) to KOA from 17,600 Chase points;
  • Denver International Airport (DEN) to LIH from 22,000 Chase points;
  • DEN to HNL from 22,000 Chase points;
  • Chicago’s O’Hare International Airport (ORD) to HNL from 25,000 Chase points; and
  • Houston’s George Bush Intercontinental Airport (IAH) to HNL from 25,000 Chase points.

That means you could book four people, round-trip flights from LAX to HNL for only 104,000 Chase Ultimate Rewards points plus $44.80 in taxes and fees. Remember, you’ll earn at least 5,000 additional Chase points by spending $5,000 on everyday purchases to earn the 100,000-point welcome offer.

Reward your inbox with the TPG Daily newsletter

Join over 700,000 readers for breaking news, in-depth guides and exclusive deals from TPG’s experts

For a card with just a $95 annual fee, this is a terrific way to maximize your travel.

United screenshot
UNITED

Chase points transfer to United at a 1:1 rate at no cost, and in our testing, transfers are usually instant.

Related: How to transfer Chase Ultimate Rewards points to United MileagePlus

Bottom line

There are so many easy ways to redeem Chase Ultimate Rewards points, and we’ll keep bringing you our favorite options and showing you just how valuable they are to help your vacation inspiration.

This 100,000 bonus point welcome offer on the Chase Sapphire Preferred Card is a strictly limited-time offer; so don’t miss out on our favorite beginner travel card.

Related reading:

Editorial disclaimer: Opinions expressed here are the author’s alone, not those of any bank, credit card issuer, airline or hotel chain, and have not been reviewed, approved or otherwise endorsed by any of these entities.


Source link

Leave a Reply

Subscribe to Our Newsletter

Get our latest articles delivered straight to your inbox. No spam, we promise.

Recent Reviews


What is Salesforce approval process ?

Approval Process in Salesforce is an automated process that automates the approval of Salesforce records in your org. In Salesforce, an approval process is a series of steps that allow a record to be approved or rejected by a user, queue, or public groups. An approval process also specifies the actions to be taken when a record is approved, rejected, recalled, or submitted for approval for the first time.

For instance, when an employee requests time off, Salesforce should automatically send an approval request to the employee’s manager. 

Wish to make a career in the world of salesforce? Start with HKR’S  salesforce online training !

Why the salesforce approval process?

Salespeople are frequently required to confirm their transactions with internal departments (for example: legal, accounting).

Typically, it entails sending numerous emails to various people, after which you must ensure that it is confirmed.It’s no secret that this process could take a long time.As a result, Salesforce created a built-in approval process that you can use to automate approval requests.Once configured, you can request approval with the click of a button.

Salesforce Training

  • Master Your Craft
  • Lifetime LMS & Faculty Access
  • 24/7 online expert support
  • Real-world & Project Based Learning

Steps for approval process in salesforce:

Here are the important steps in the salesforce approval process. They are:

  • Setup -> Create -> Workflow and Approval -> Approval Process
  • Select object for approval process to be written
  • Click on Create New Approval Process
  • Select Standard Setup Wizard from drop down
  • Enter the Process name, Unique Name and description for your process
  • Specify Entry criteria 

Salesforce approval process example:

The following are the sections that must be configured in the salesforce approval process:

  • Process Definition Detail – Approval Process Header level information such as name, email template, and so on.
  • Initial Submission Actions – It would be executed whenever the customers click on the object record’s ‘Submit for Approval’ button.
  • Approval Steps – Specifics on the Steps criteria and approvers
  • Final Approval Actions – It will be carried out once all of the approval process steps have been approved.
  • Final Rejection Actions – This action will be taken if one of the approval process steps is rejected.
  • Recall Actions – This will be carried out if one of the approval process steps is recalled.

Create an Approval Process:

Let’s create an approval process in which the sales manager approves possibilities with a total opportunity value greater than $500,000. The opportunity’s approval status should be reflected: Approved or Rejected.

Planning:

Carefully plan ahead of time before you begin configuring the Approval process in Salesforce, as this will allow you to design the approval process in the most efficient manner. Preparation entails the following steps:

  • creation of mandatory fields
  • Determine the object for the Approval procedure.
  • Final Approval of the Email Template Actions such as unlocking the record or changing the record’s status

Wish to make a career in the world of salesforce? Start with HKR’S  salesforce training in London !

HKR Trainings Logo

Subscribe to our YouTube channel to get new updates..!

Creating approval process:
  • Log in to Salesforce; however, if you are already logged in, you can skip this step.
  • To Manage Approval Processes, go to Setup and search for ‘Approval Process’ in Quick Find, or go to ‘Create’->Workflow & Approvals -> Approval Process. For, choose Opportunity.

Create an Approval Process

  • Select Create New Approval Process | Use Jump Start Wizard from the drop-down menu.
  • By making some decisions for you, the Jump Start Wizard assists you in creating a simple approval process.
  • Set up the approval procedure.

Set up the approval procedure

  • Keep the approval process in mind.
  • View the Approval Process Detail Page by clicking the View Approval Process Detail Page button.
  • Click Add New | Field Update under Final Approval Actions and fill in the blanks with these values.

Field Update under Final Approval

  • Then click on the save option.
  • Under Final Rejection Actions, tap Add New | Field Update and fill in the blanks with the following principles.
  • Click on save.so that your approval process has been successfully configured.

Click here to get frequently asked Salesforce interview questions & answers

Approval Actions:

In the preceding example, we only used ‘Field Update.’ I’d like to go over Approval Actions in more detail, such as Final Approval Actions and Final Rejection Actions, which include:

Task – If a job is selected, the user will input a task for a record, such as Opportunity, once the application process has indeed been approved/rejected.

If an Email Alert is selected, the message will be displayed via email once the approval process has been approved or rejected.

Field Update – You already saw an example within the preceding section, but once the approval process has indeed been approved/rejected, the framework would then update the field towards the specified value.

Outbound Message – This will assist in notifying third-party systems. Consider a scenario in which you would like to inform the derived or provisioning system of the approval results; for instance, once orders are approved, begin generating bills; this will assist you in meeting the requirement.

Approval Actions

Wish to make a career in the world of salesforce? Start with HKR’S  Salesforce Training in Atlanta !

Salesforce Training

Weekday / Weekend Batches


Email to approve request:

We can configure the approval process via email; to allow email approval response, follow the directions below.

Setup -> Process Automation Settings -> Enable Email Approval Response checkbox, and then click Save.

Some words could be used in the first line of a response to an approval request with periods or exclamation marks. Approved, Approved, and Yes are used for approval, while Reject, Rejected, and No are used for rejection.

Conclusion:

In the above blog post we had discussed the salesforce approval process steps in depth. Had any doubts drop your queries in the comments section to get them clarified.

Related Articles:


Source link