How to use 100,000 Chase points to fly lie-flat to Europe


The Chase Sapphire Preferred® Card (see rates and fees) is now even more valuable after its recent refresh added new benefits, like a $100 annual Chase Travel℠ hotel credit each anniversary year and a $120 application fee credit for Global Entry, TSA PreCheck or Nexus.

But that’s not all: For a limited time, you can also earn 100,000 bonus points after spending $5,000 on purchases in the first three months from account opening.

To celebrate, we are sharing some of the best and easiest ways to maximize this limited-time offer. So far, we’ve shown you how to book round-trip flights for the whole family to Hawaii and how to fly business class to Japan with 100,000 Chase Ultimate Rewards points.

Next up: How to fly business class to Europe using the points from this welcome bonus.

Chase Ultimate Rewards can be transferred to several airline partner programs to book these flights. For example, you can book business-class flights to Spain on Iberia from as few as 40,500 Chase points transferred to British Airways Club (or Iberia Club) at a 1:1 rate; however, this exceptional price is available on only a handful of nonstop routes from the Northeast to Adolfo Suárez Madrid-Barajas Airport (MAD).

Another option is to transfer your Chase points to Air France-KLM’s Flying Blue program, where business-class flights on a wider network start from 60,000 miles per person. However, as these are priced dynamically, on popular dates the redemption rates can be much higher than this and carrier-imposed surcharges are also payable.

A better option for most travelers is Air Canada Aeroplan, which offers a fixed business-class rate to Europe and good availability across a wide range of Star Alliance airlines and transatlantic routes.

I’ve transferred Chase Ultimate Rewards points to Aeroplan myself to book business-class flights to Europe many times, and it’s a terrific way to travel lie-flat on overnight flights and arrive rested and refreshed.

Business class to Europe from 60,000 points

Air Canada Aeroplan (1:1 transfer from Chase Ultimate Rewards, transfers should be instant)

From 60,000 points one-way, plus a 39 Canadian dollar (about $27) partner booking fee and minimal taxes

At least 2 cents per point

Lufthansa, Swiss, Austrian, TAP Air Portugal, Brussels Airlines and LOT Polish. United Airlines is also available at higher rates.

Anyone who wants a comfortable lie-flat journey to Europe

Related: How to transfer Chase Ultimate Rewards points to Air Canada Aeroplan

Reward your inbox with the TPG Daily newsletter

Join over 700,000 readers for breaking news, in-depth guides and exclusive deals from TPG’s experts

Aeroplan prices partner-operated business-class awards to Europe by distance as follows (one-way, per person):

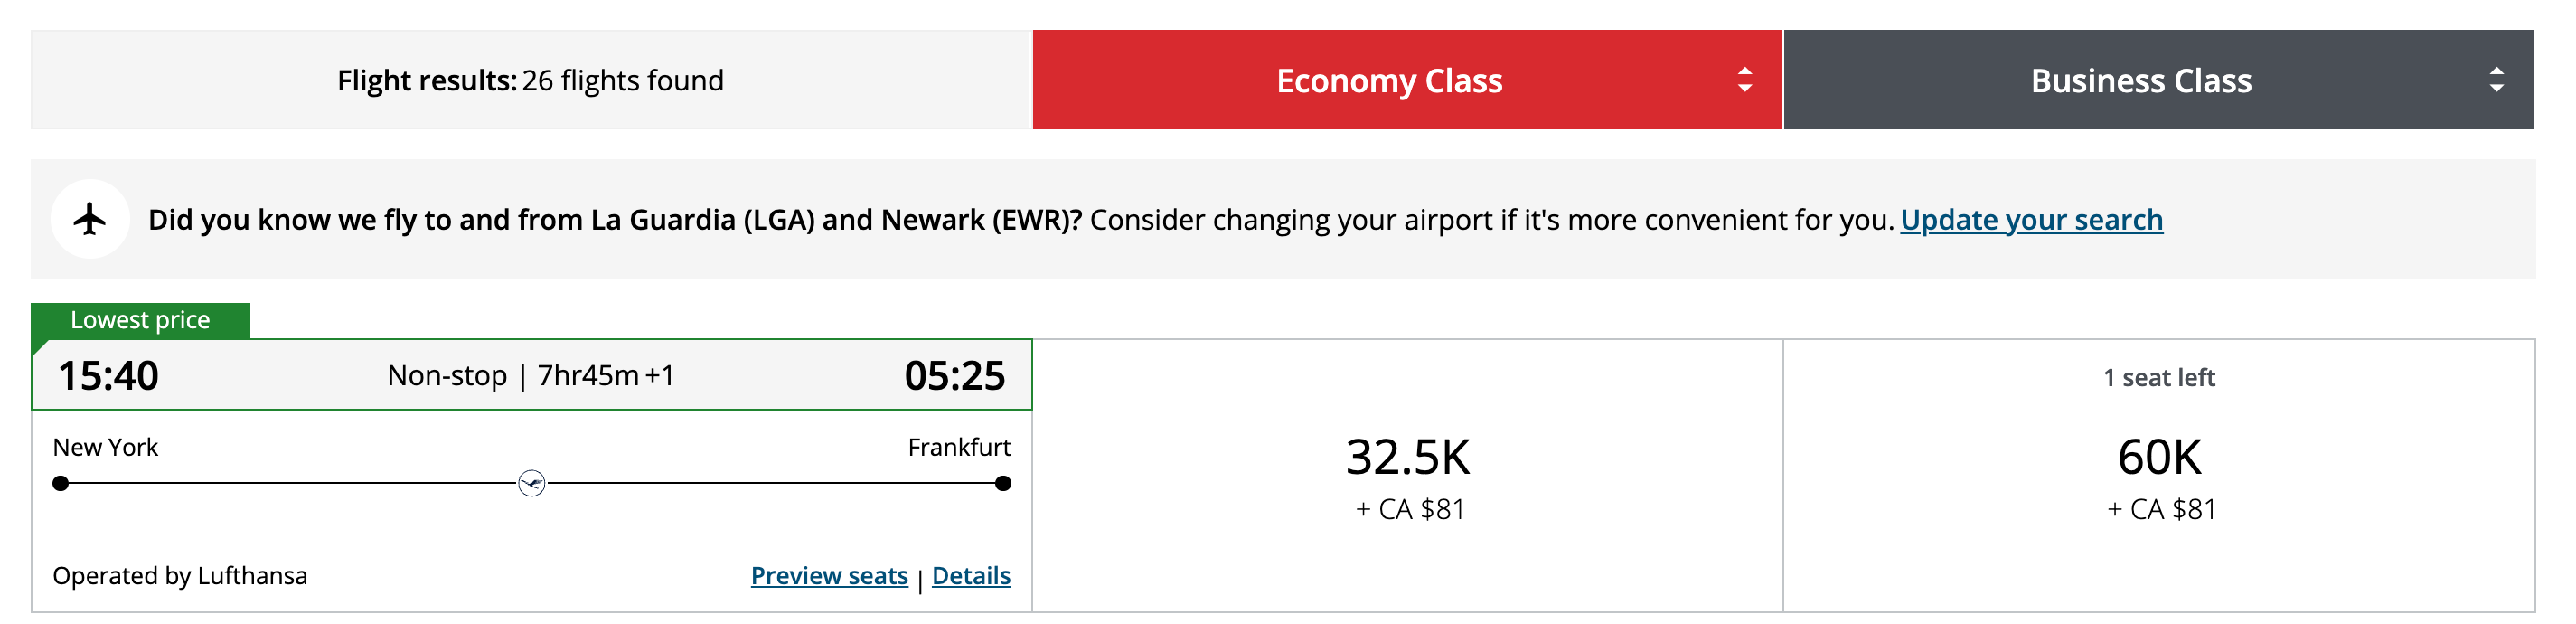
  • Itineraries up to 4,000 miles: 60,000 points. This includes New York’s John F. Kennedy International Airport (JFK), Newark Liberty International Airport (EWR), Boston Logan International Airport (BOS) and Dulles International Airport (IAD) to most of Western Europe.
Aeroplan screenshot
AEROPLAN
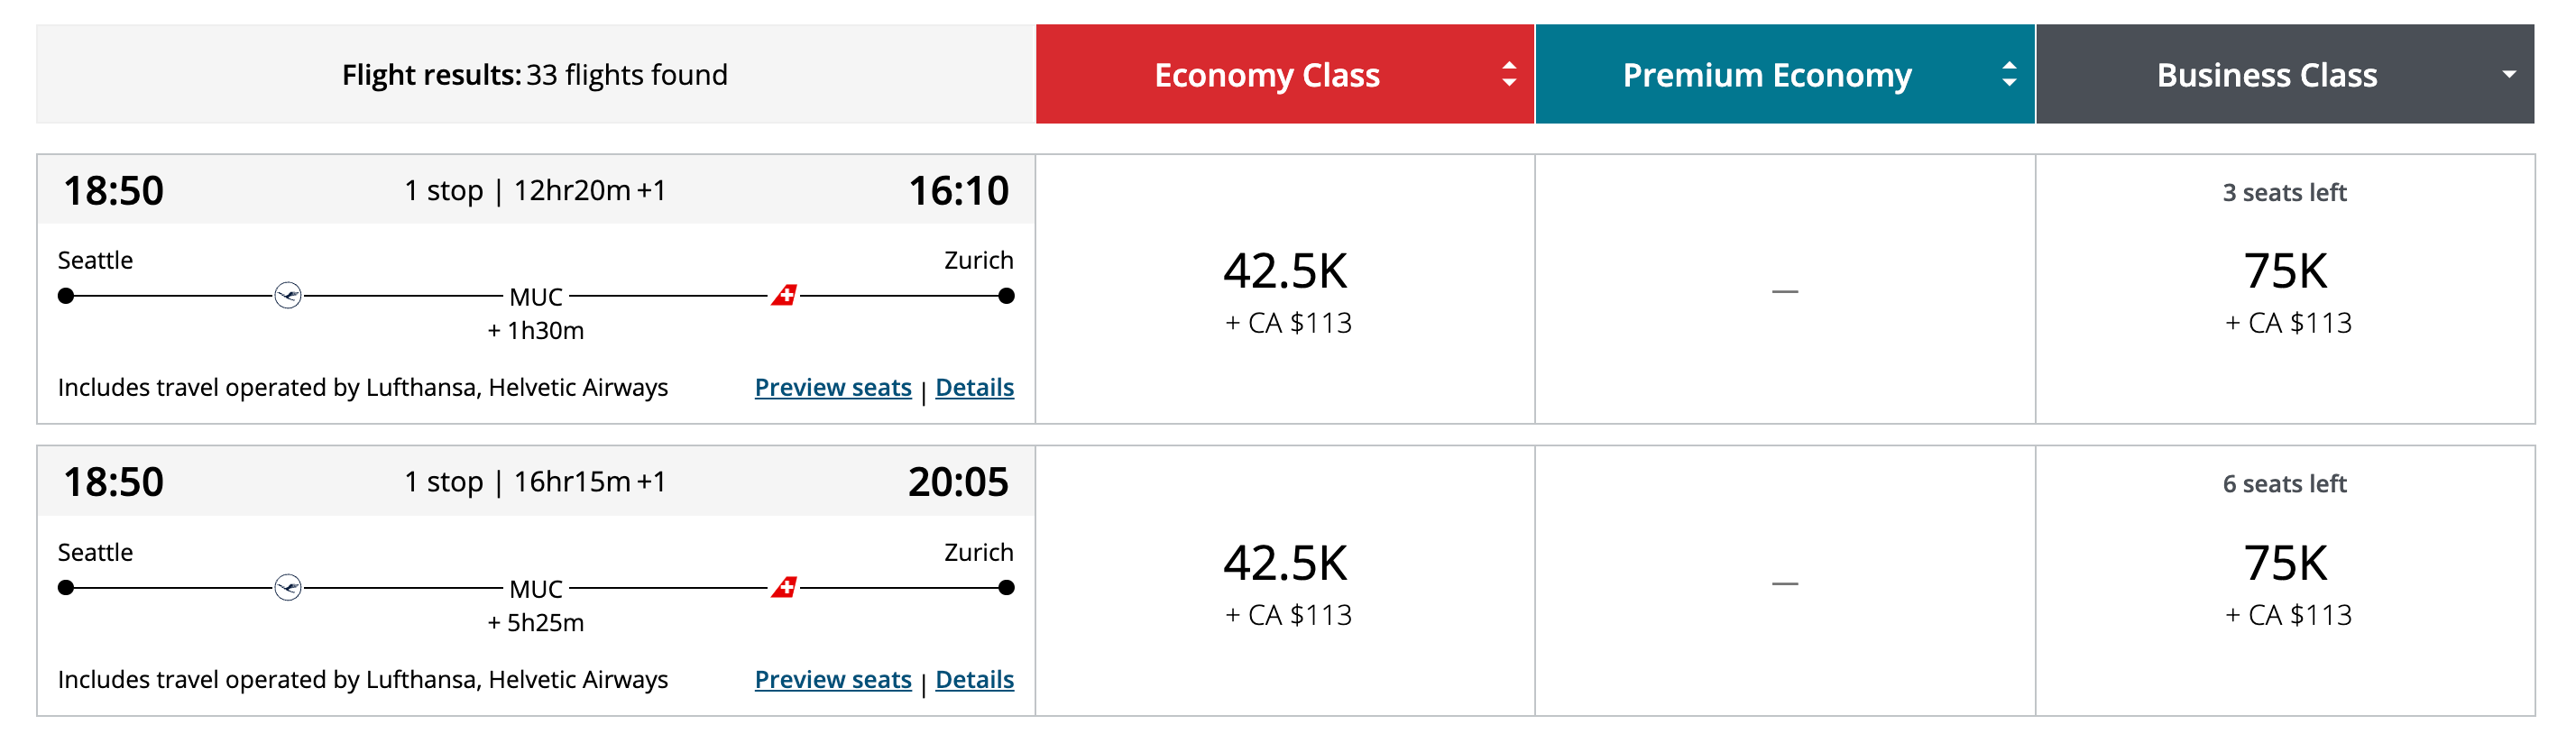
  • Itineraries 4,001 to 6,000 miles: 75,000 points. This includes Chicago’s O’Hare International Airport (ORD), Miami International Airport (MIA), Seattle-Tacoma International Airport (SEA), Houston’s George Bush Intercontinental Airport (IAH), Denver International Airport (DEN), Los Angeles International Airport (LAX), and San Francisco International Airport (SFO) to most of Western Europe as well as the Northeast to most of Central and Eastern Europe.
Aeroplan screenshot
AEROPLAN
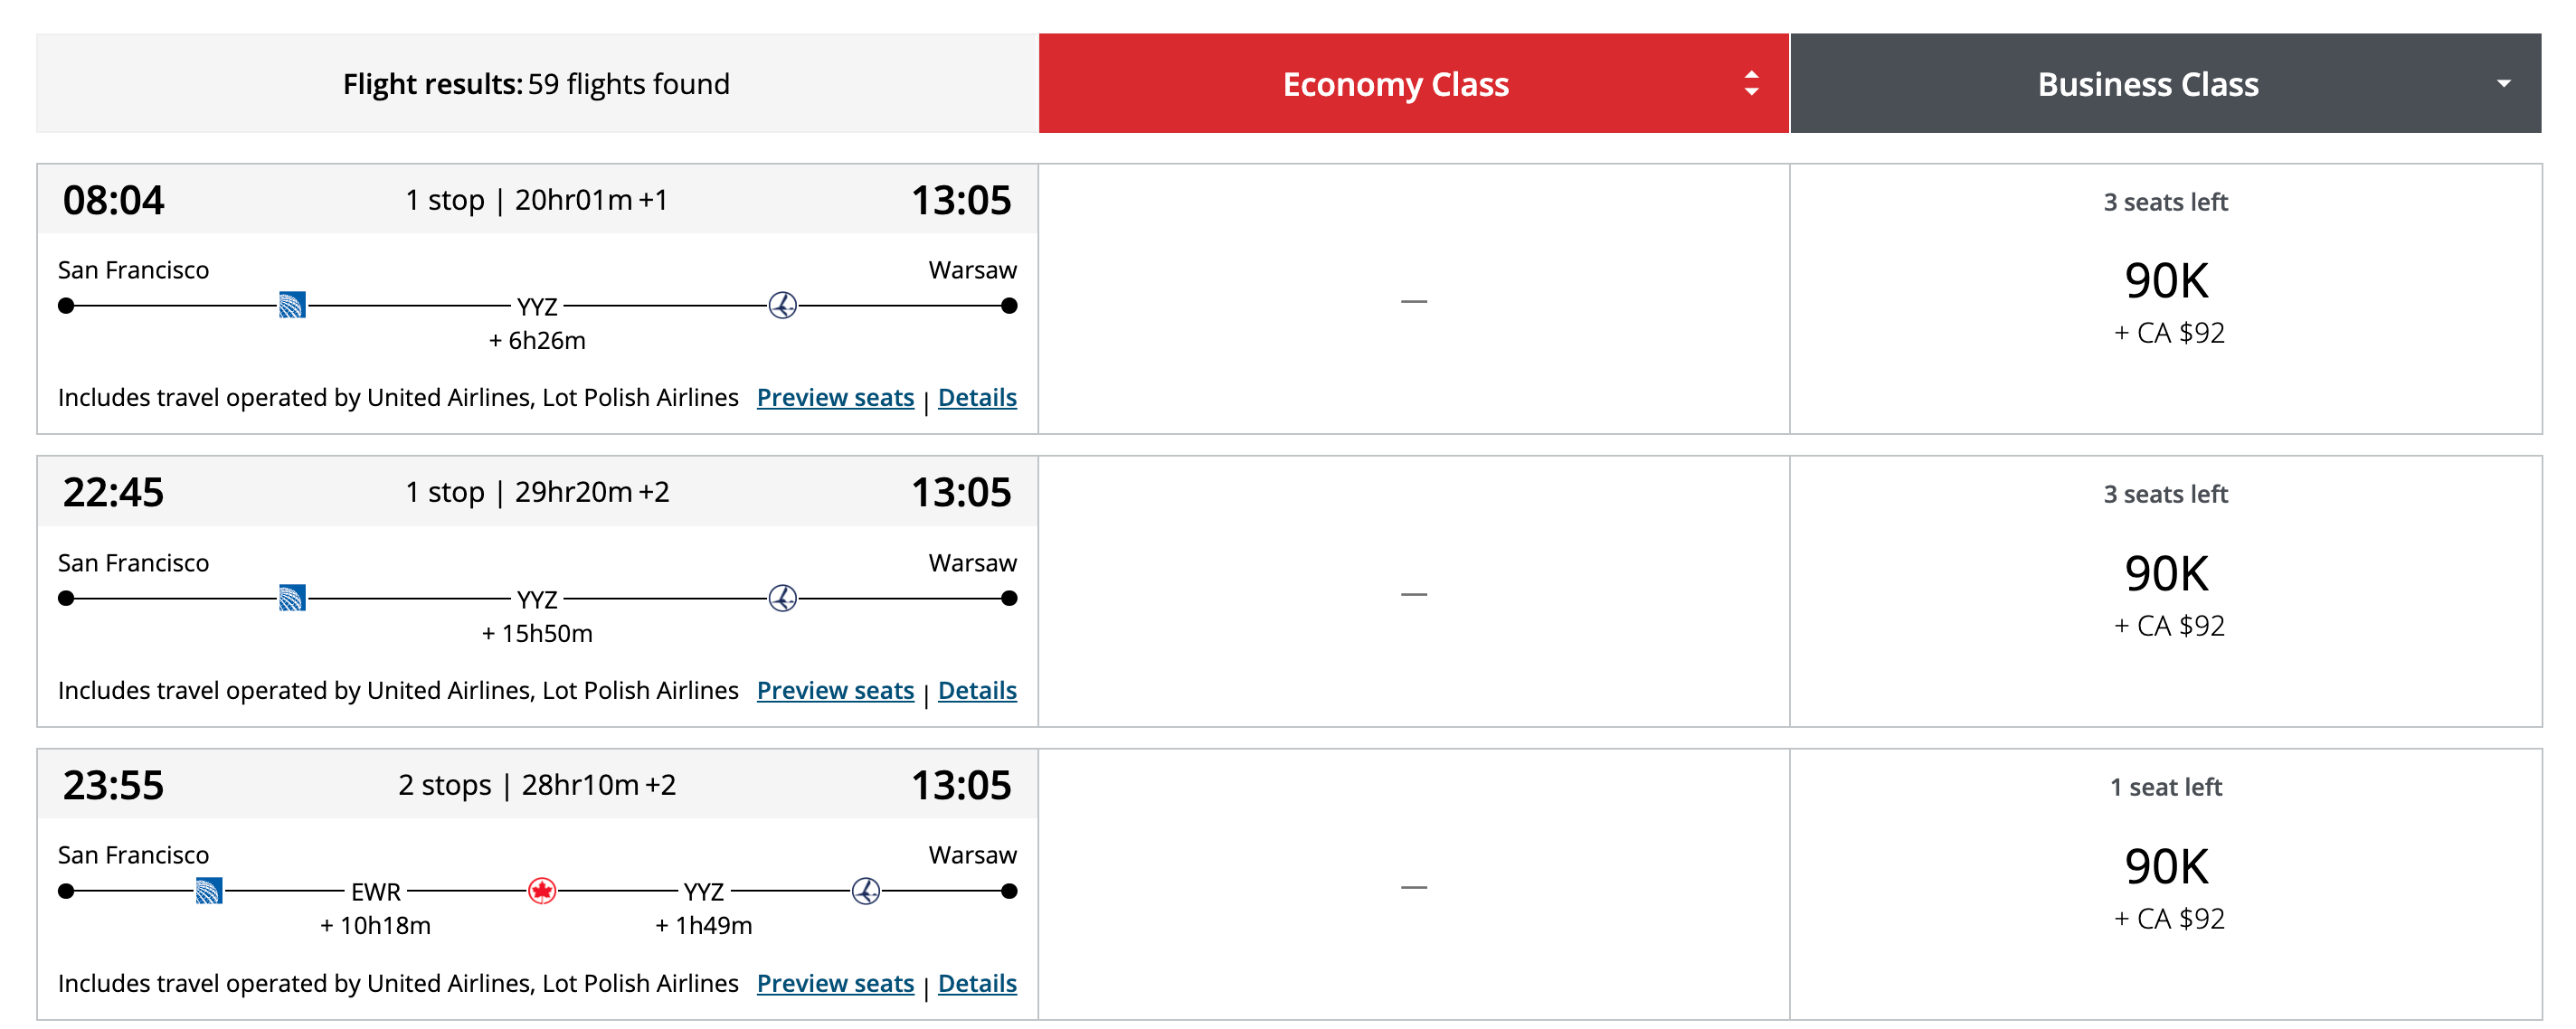
  • Itineraries 6,001 to 8,000 miles: 90,000 points. This includes the West Coast to Central and Eastern Europe.
Aeroplan screenshot
AEROPLAN

Bottom line

Booking business-class seats to Europe via Aeroplan is one of the most luxurious and best-value ways to redeem Chase Ultimate Rewards points.

We’ll keep bringing you our favorite redemption options and showing you just how easy it is to book.

This 100,000-point welcome offer on the Chase Sapphire Preferred Card is a strictly limited-time offer, so don’t miss out.

Related reading:


Source link

Leave a Reply

Subscribe to Our Newsletter

Get our latest articles delivered straight to your inbox. No spam, we promise.

Recent Reviews


Install ElasticSearch – Table of Content

In this tutorial, you will learn the general features of Elasticsearch and how to install the elasticsearch step by step.

                       Become a Elasticsearch Certified professional  by learning Elasticsearch online course from hkrtrainings! 

Elasticsearch key features:

The following are the curated features of elasticsearch. They are:

  • Elasticsearch can handle unstructured data up to petabytes in size.
  • Elasticsearch can be used to replace document stores such as MongoDB and RavenDB.
  • Denormalization is used by Elasticsearch to improve search performance.
  • Elasticsearch is a popular enterprise search engine that is currently used by many large organizations such as Wikipedia, The Guardian, StackOverflow, GitHub, and others.
  • Elasticsearch is open source and distributed under the Apache License 2.0. 

Now we will learn about the installation of elasticsearch step by step.

Installation of Elasticsearch:

Step1: Explore the version of Java that is installed on your computer. Java 7 or higher is required. You can double-check by doing the following:

In the Windows Operating System (OS) (via the command prompt)

>java-version

In UNIX OS (Using Terminal) −

$ echo $JAVA_HOME

Step2: Download Elasticsearch from www.elastic.co, as indicated below, depending on your operating system.

  • Download the ZIP file for Windows.
  • Download the TAR file for UNIX OS.
  • Download the DEB file for Debian OS.
  • Download the RPN file for Red Hat and other Linux distributions.
  • In many Linux distributions, the APT and Yum utilities can also be used to install Elasticsearch.

Step3:

Elasticsearch installation is straightforward, as described below for various operating systems.Windows Operating System Elasticsearch is installed after unzipping the zip package.UNIX Operating System Elasticsearch is installed after extracting the tar file to any location.

$wget

https://artifacts.elastic.co/downloads/elasticsearch/elasticsearch7.0.0-linux-x86_64.tar.gz

$tar -xzf elasticsearch-7.0.0-linux-x86_64.tar.gz

  • Use the APT utility for Linux OS− Download and install the Public Signing Key

$ wget -qo – https://artifacts.elastic.co/GPG-KEY-elasticsearch | sudo

apt-key add –

Save the repository definition as shown below −

$ echo “deb https://artifacts.elastic.co/packages/7.x/apt stable main” |

sudo tee -a /etc/apt/sources.list.d/elastic-7.x.list

  • Perform run update function using the below command.

$ sudo apt-get update

ElasticSearch Training

  • Master Your Craft
  • Lifetime LMS & Faculty Access
  • 24/7 online expert support
  • Real-world & Project Based Learning

Now you need to install by using the following command −

$ sudo apt-get install elasticsearch

  • Now download and install the Debian package manually using the command given here −

$wget https://artifacts.elastic.co/downloads/elasticsearch/elasticsearch7.0.0-amd64.deb

$sudo dpkg -i elasticsearch-7.0.0-amd64.deb0

  • Using YUM utility for Debian Linux OS

Download and install the Public Signing Key −

$ rpm –import https://artifacts.elastic.co/GPG-KEY-elasticsearch

  • ADD the following text in the file with the .repo suffix in your “/etc/yum.repos.d/” directory. For example, elasticsearch.repo

elasticsearch-7.x]

name=Elasticsearch repository for 7.x packages

baseurl=https://artifacts.elastic.co/packages/7.x/yum

gpgcheck=1

gpgkey=https://artifacts.elastic.co/GPG-KEY-elasticsearch

enabled=1

autorefresh=1

type=rpm-md

  • Now you can now install Elasticsearch by using the following command

sudo yum install elasticsearch

Step4: Navigate to the bin folder in the Elasticsearch home directory. In the case of Windows, run the elasticsearch.bat file, or in the case of UNIX, use command prompt and terminal to run the Elasticsearch file.

In Windows

> cd elasticsearch-2.1.0/bin

> elasticsearch

Big Data Analytics, install-elasticsearch-description-0, Big Data Analytics, install-elasticsearch-description-1

Subscribe to our YouTube channel to get new updates..!

In Linux

$ cd elasticsearch-2.1.0/bin

$ ./elasticsearch

Step5: The default port for the Elasticsearch web interface is 9200, but this can be changed by changing http.port in the elasticsearch.yml file located in the bin directory. To see if the server is up and running, go to http://localhost:9200. It will return a JSON object containing information about the installed Elasticsearch in the format shown below.

{

   "name" : "Brain-Child",

   "cluster_name" : "elasticsearch", "version" : {

      "number" : "2.1.0",

      "build_hash" : "72cd1f1a3eee09505e036106146dc1949dc5dc87",

      "build_timestamp" : "2015-11-18T22:40:03Z",

      "build_snapshot" : false,

      "lucene_version" : "5.3.1"

   },

   "tagline" : "You Know, for Search"

}

Step6: Now we should install Kibana. Follow the respective code given below for installing on Linux and Windows −

For Installation on Linux −

wget https://artifacts.elastic.co/downloads/kibana/kibana-7.0.0-linuxx86_64.tar.gz

tar -xzf kibana-7.0.0-linux-x86_64.tar.gz

cd kibana-7.0.0-linux-x86_64/

./bin/kibana

For Windows Installation

Kibana for Windows can be downloaded from https://www.elastic.co/products/kibana. When you click the link, you will be taken to the home page, as shown below.

installation_on_windows

Unzip and go to the Kibana home directory in order to run it. 

CD c:\kibana-7.0.0-windows-x86_64

.\bin\kibana.bat

ElasticSearch Training

Weekday / Weekend Batches

Conclusion:

In the above blog post we had explained about the installation steps of elasticsearch both for linux and windows operating system. Had any queries drop them in the comments section to get them resolved.

Related Articles:


Source link