When you hear the words “carry-on,” you might picture someone pulling a small-ish wheeled suitcase up the boarding ramp. Sure, a suitcase can be a carry-on, but what about a backpack?

I’ve been traveling for years, and during most of that time, I’ve used a backpack.

In this article, we’ll explore the ins and outs of carry-on luggage, focusing on backpacks. We’ll dive into what makes a bag a carry-on, when a backpack fits the bill, and how to choose the perfect carry-on backpack for your travels. By the end, you’ll be equipped with all the knowledge you need to pack confidently and travel smartly.

This comprehensive guide explores whether a backpack can be used as a carry-on, detailing size requirements, the advantages and disadvantages of using backpacks for travel, how to choose the right carry-on backpack, and offering practical tips for efficient packing and comfortable travel.

Understanding Carry-On and Personal Items

Before we dive into the backpack specifics, let’s clarify what we mean by carry-on and personal items. These terms are crucial to understand as they directly impact what you can bring onboard and how you pack.

Carry-On Item

A carry-on item is luggage that you’re allowed to bring into the airplane cabin and store in the overhead bin. Airlines have specific size and weight limits for carry-on bags, which can vary between carriers.

Typically, the maximum dimensions for a carry-on are around 22″ x 14″ x 9″ (56 cm x 36 cm x 23 cm), but always check with your specific airline as there can be slight variations. Anything larger than this maximum size will need to be checked.

It’s worth noting that some budget airlines have stricter carry-on policies, sometimes only allowing a personal item for free and charging for a full-sized carry-on. Always read the fine print when booking your tickets.

Personal Item

A personal item is smaller than a carry-on and must fit under the seat in front of you. This could be a purse, laptop bag, or small backpack. The size limit for personal items is usually around 18″ x 14″ x 8″ (45 cm x 35 cm x 20 cm), but again, this can vary by airline.

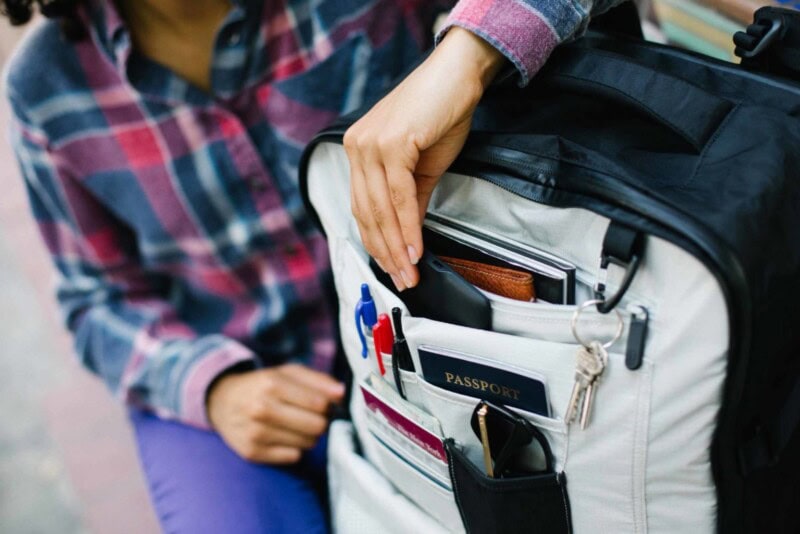
I always make sure to have a personal item bag with me, usually a small backpack, where I keep essentials like my passport, wallet, and a book or tablet for entertainment during the flight. This strategy ensures that even if I’m asked to gate-check my carry-on (which can happen on full flights), I still have my valuables and necessities with me.

When Is a Backpack a Carry-On?

Now that we’ve got the basics down, let’s address the main question: When can a backpack be considered a carry-on?

Size and Fit

The primary factor determining whether your backpack qualifies as a carry-on is its size. If your backpack fits within the airline’s carry-on size limits, congratulations! You’ve got yourself a carry-on backpack.

It really is that simple.

However, it’s crucial to measure your backpack when it’s fully packed. An empty backpack might seem to fit the requirements, but once stuffed with your travel essentials, it could exceed the limits.

Pro tip: I always pack my backpack as I intend to for the trip, then measure it. This way, I avoid any surprises at the airport.

Types of Backpacks

Types of Backpacks

There are a lot of different backpack designs out there, and the good news is that any of them can be a carry-on, as long as they’re the right size.

  • Travel-Specific Backpacks: These are made with air travel in mind. Most of these are designed specifically around carry-on size limits.
  • Daypacks: Smaller backpacks usually used for day trips or as commuter bags. These often fit as personal items, but larger ones might count as your carry-on if they exceed personal item size limits.
  • Hiking Backpacks: While not specifically designed for air travel, many hiking backpacks can work as carry-ons if they fit within the size limits. Just be mindful of any protruding straps or attachments that might catch on things in the overhead bin.

Why Choose a Backpack as a Carry-On

Now that we know a backpack can indeed be a carry-on, let’s explore why you might want to choose one over traditional luggage.

Versatility and Mobility

Carry-On Versatility and Mobility

One of the biggest advantages of a backpack is the hands-free mobility it offers. Picture yourself rushing through a crowded airport or navigating uneven cobblestone streets in a charming European town. With a backpack, you’re free to move quickly and efficiently, hands available for checking your phone for directions or grabbing a quick snack.

I remember a trip where I had to sprint to catch a connecting flight. My backpack allowed me to weave through the crowd much more easily than if I’d been dragging a rolling suitcase behind me.

For adventurous travelers who like to go off the beaten path, a backpack is easily the best choice. It’s much easier to hop on and off public transportation, navigate stairs, or trek along a rough trail with a backpack than with wheeled luggage.

Organization

Modern travel backpacks are marvels of organization. Many come with multiple compartments, pockets, and even removable packing cubes. This setup allows you to organize your belongings more efficiently and access essentials quickly during your journey.

I particularly love backpacks with a separate laptop compartment and easy-access pockets for items like my passport and boarding pass. It makes going through security a breeze!

Some backpacks even come with innovative features like built-in USB charging ports, allowing you to charge your devices on the go. Others have RFID-blocking pockets to protect your credit cards and passport from electronic pickpocketing.

Adaptability

The adaptability of carry-on backpacks makes them a great choice for various types of travel. Whether you’re on a business trip in a bustling city or heading for a weekend of hiking, a well-chosen backpack can serve you equally well.

For instance, I’ve used the same backpack for both international business trips and overnight hikes. With a few adjustments, my backpack seamlessly transitioned between these very different environments. You can’t do that with a suitcase.

Downsides of Choosing a Backpack as a Carry-On

While backpacks offer many advantages, it’s only fair to discuss potential drawbacks as well. For some types of travel, an old-school suitcase is still going to be the better option.

Physical Strain

Carry-On Physical Strain

Carrying a heavy backpack for extended periods can lead to discomfort and strain on your back, shoulders, and neck, even with padded straps and ergonomic designs. I’ve learned the hard way that overpacking a backpack can lead to some sore muscles by the end of the day.

To mitigate this, it’s crucial to pack light and distribute weight evenly. Also, make sure to adjust your backpack straps properly for your body. Many travelers wear their backpacks too low, which can cause unnecessary strain.

Less Protection

Backpacks generally offer less protection for fragile items compared to hard-shell suitcases. They might also lack secure locking mechanisms, making them more vulnerable to theft.

I always make sure to pack any valuable or breakable items (like cameras) in padded cases and keep them in the center of my backpack for extra protection.

If security is a major concern, consider investing in a backpack with anti-theft features like slash-proof material, hidden zippers, and locking cables. Brands like Pacsafe specialize in these types of security-focused bags.

How to Choose a Good Carry-On Backpack

If you’ve decided a backpack is the right carry-on choice for you, here’s what to look for when selecting one:

Size and Compliance

Good Carry-On Backpack

First and foremost, ensure the backpack meets the carry-on size requirements of the airlines you frequently travel with. As mentioned earlier, this is typically around 22″ x 14″ x 9″. Some backpack manufacturers design their products specifically to comply with these limits, which can give you extra peace of mind.

When shopping, look for backpacks marketed as “carry-on compliant” or “airline approved.” These are designed to maximize the allowed carry-on space while staying within the limits of most airlines.

Comfort and Ergonomics

Look for features that will make carrying your backpack more comfortable, especially if you’ll be wearing it for extended periods. I recommend finding a backpack with thick shoulder strap padding, a supportive back panel, and a hip belt to take the weight off your shoulders.

It’s also worth trying on a backpack before you buy it—or, if you’re shopping online, buy from a company that has a good return policy. Even if a backpack checks all the boxes for comfort, it just may not fit your body.

Once you get your backpack, load it up with weight, put it on your back, and try walking around. Are there any pressure points? Does the weight feel supported?

Organization and Accessibility

Choose a backpack with multiple compartments, including dedicated sections for electronics, toiletries, and other essentials. Easy access pockets for quick-reach items like passports and tickets are a bonus. Some backpacks even open like a suitcase, making packing and unpacking much easier.

Look for features like:

  • A padded laptop compartment
  • Internal compression straps to keep clothes in place
  • External water bottle pockets
  • A top quick-access pocket for items you need to reach frequently

I’m a big fan of backpacks with a “clamshell” opening, which allows you to pack and access your belongings more like a traditional suitcase.

Durability and Material

Carry-On Material

Opt for a backpack made from durable, water-resistant materials that can withstand the rigors of travel. Reinforced stitching and quality zippers also contribute to the longevity and security of the bag. My travel backpack is almost 10 years old, and it’s still going strong because it was well-made to begin with.

Look for high-quality materials like Cordura or heavy-duty ripstop nylon. YKK zippers are known for their reliability, so keep an eye out for these.

Tips for Traveling with a Carry-On Backpack

Once you’ve chosen your perfect carry-on backpack, here are some tips to make your travels smoother:

Pack Light

Tips for Travel with Carry-On

One of the best pieces of advice I can give you is to pack light. You’ll be much happier and more comfortable if your backpack isn’t super heavy. Using a carry-on backpack is a great opportunity to get more minimalist with your travel gear. Ask yourself if you really need that extra pair of shoes or that bulky jacket.

A good rule of thumb is to lay out everything you think you need, then remove about a third of it. You’ll likely find you can manage with less than you initially thought.

Pack Strategically

Use packing cubes and compression bags to maximize space and keep your belongings organized. I swear by packing cubes – they’ve revolutionized the way I pack! Also, try rolling your clothes instead of folding them. This technique not only minimizes wrinkles but also saves space.

Here are some basic packing strategies I use:

  • Heavy items at the bottom (near your lower back when wearing the backpack)
  • Softer, lighter items on top
  • Frequently needed items in easy-access pockets
  • Don’t forget to use every bit of space – stuff socks and underwear into shoes, for example.

Distribute Weight Evenly

Place heavier items at the bottom of the backpack and closer to your back to maintain balance and reduce strain. Use the backpack’s various compartments to evenly distribute weight and avoid overloading one side. Your back will thank you later!

If your backpack has a hip belt, make sure to use it. It helps transfer weight from your shoulders to your hips, making the load feel much lighter.

Check Airline Policies

Always verify the size and weight restrictions of your airline’s carry-on luggage to avoid additional fees or the need to check your backpack. Each airline has specific guidelines that can vary, so it’s essential to be aware of them before packing. I make it a habit to double-check these policies before every trip, even if I’ve flown with the airline before, as rules can change.

Be especially vigilant with budget airlines, as they often have stricter and more variable luggage policies.

Use Your Personal Item Wisely

Remember, in addition to your carry-on backpack, you’re usually allowed a personal item. Use a small daypack or laptop bag for this and pack it with items you’ll want easy access to during the flight, as well as any valuables or fragile items.

Be Prepared for Security

Security Check

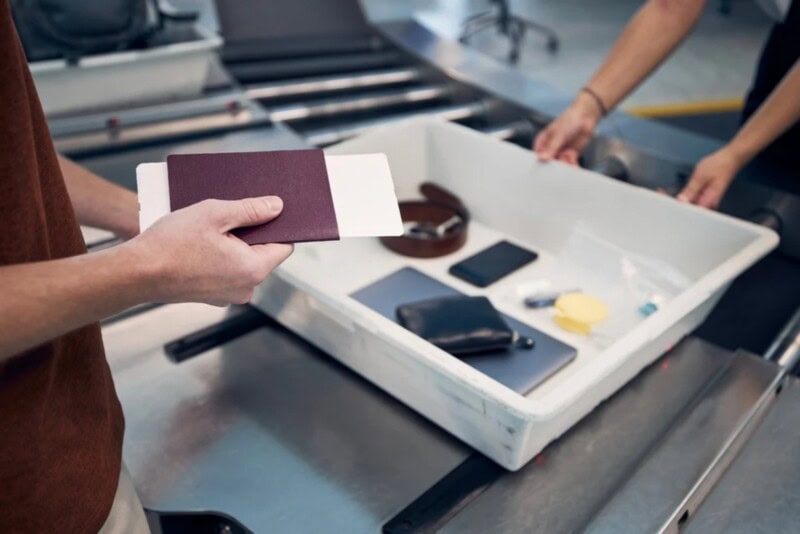
To breeze through security, pack your liquids in an easily accessible spot and be prepared to remove your laptop if required. Some backpacks have TSA-friendly laptop compartments that can be laid flat on the X-ray belt without removing the laptop.

Practice Makes Perfect

Before your trip, do a test by packing all your travel gear in your backpack to make sure it fits. Wear your fully packed backpack around the house or on a short walk. This will give you a feel for the weight and help you identify if you need to make any adjustments.

Conclusion

So, is a backpack a carry-on? The answer is: it can be! As long as your backpack fits within the airline’s size restrictions for carry-on luggage, you’re good to go. Backpacks offer a level of versatility and mobility that traditional luggage can’t match, making them an excellent choice for many types of travelers.

Remember, the key to successful travel with a backpack as your carry-on lies in choosing the right backpack, packing smartly, and always being aware of airline policies. By following the tips and advice in this article, you’ll be well-prepared to navigate airports and explore your destinations with ease and comfort.

Traveling with a backpack can open up a world of possibilities. It allows you to be more mobile, adapt to different situations, and often avoid those pesky checked baggage fees. Plus, there’s something liberating about knowing everything you need is right there on your back.

The goal is to make your travels smoother and more enjoyable. A well-chosen and properly packed carry-on backpack can be your ticket to hassle-free adventures. So go ahead, embrace the backpack life, and get ready to explore the world with newfound freedom and flexibility.

FAQ

Is a backpack considered a carry-on?

A backpack can be considered a carry-on as long as it fits within the airline’s carry-on size restrictions.

Can you take a backpack on a plane for free?

You can take your backpack on a plane for free as long as it’s small enough to fit within the personal item size limits.

What size backpack fits under an airplane seat?

The most common size limit for a personal item backpack to go under the airplane seat is 18” x 14” x 8”.

Can I bring a backpack through TSA?

Yes, you can bring a backpack through TSA as long as it is small enough to count as a carry-on.

What happens if your personal item is too big?

If your personal item is too big, it will have to count as your carry-on. That means you may have to check your main carry-on or pay an extra fee.

About the Author

Nick Reed

As a Manchester City fan, he made it his mission to catch matches at legendary stadiums from Camp Nou to the Etihad. But Nick’s travels go beyond football. He’s explored 20+ countries across Europe, Africa, and the Caribbean, always chasing authentic experiences over tourist traps. Nick lives by a simple rule: the best stories come from saying yes to the unexpected. And TravelFreak is his biggest yes yet.

More Articles »


Source link

Leave a Reply

Subscribe to Our Newsletter

Get our latest articles delivered straight to your inbox. No spam, we promise.

Recent Reviews


PowerBI with SQL Server- Table of Content

What is Power BI?

Power BI is indeed a set of software tools, applications, and interfaces which works together to transform disparate data sources into logical, visualizations, and engaging information. The information could be in the form of an Excel spreadsheet or even a set of blended data warehouses which are both cloud-based and on-premises. Power BI makes it simple to link to various data sources, display and uncover what matters, and share your findings with whomever you choose.

  Become a Power BI Certified professional by learning this HKR Power BI Training !

Power BI’s elements:

Beginning with the three fundamentals, Power BI is made up of various components working together:

  • Power BI Desktop for Windows is a desktop app.
  • The Power BI service is a cloud-based SaaS (Software as a Service) application.
  • In iOS, Windows, & Android smartphones, there are Power BI mobile apps.

Power BI Desktop, the platform, as well as the mobile applications, are all intended to help you generate, distribute, and utilize market intelligence in the most efficient way possible.Apart from them, Power BI has two more characteristics: the Power BI Report Builder, which allows you to create paginated reports that you can distribute through the Power BI service, and the Power BI Data Warehouse. On-premises data server powered by Power BI. After developing your Power BI reports in Power BI Desktop, you may upload them to Power BI Report Server, a report server.Power BI's elements

The Benefits of Power BI

Power BI has a number of features that set it apart from other analytical tools:

  • It has both a cloud-based and a desktop interface.
  • Data warehousing, analytic tools, and interactive dashboards are some of the features available.
  • Customized visualizations can be loaded.
  • It’s simple to scale throughout the entire company.

Become a Sisense Certified professional by learning this HKR Sisense Training

What is SQL Server?

SQL (Structured Query Language) is a crucial skill in the field of data science, and it’s quite simple to master. Most people, however, overlook the fact that SQL is more than just generating queries, but that’s only the first step. It’s a different matter to ensure that inquiries are efficient or even that they match the environment in which you’re working.

Microsoft’s SQL Server is a relational database management system (RDBMS). It was created largely to compete with the MySQL and Oracle databases. The standard SQL language is supported by SQL Server. T-SQL, SQL Server’s own version of a SQL language, is included (Transact-SQL).  T-SQL stands for Transact-SQL, a Microsoft proprietary language. It also has the ability to declare variables, handle exceptions, and run stored procedures, among other things. Another important interface tool for SQL Server is SQL Server Management Studio (SSMS), which works in both 32-bit and 64-bit settings.

SQL Server helps to run several services at the same time, each with its own ports, logins, databases, and so on. These are separated into two categories:

  • Primary Instance.
  • Instances with a Name

There are two methods for gaining access to the primary instance. We can start with the server name. We can also utilize its IP address. By attaching a backslash and the instance name, you can access named instances.

Is SQL important for Power BI?

Power BI Desktop’s ability to conduct T-SQL queries gives you useful resources for retrieving SQL Server data. Perhaps you’ll be able to get the most out of the SQL Server query engine, and you’ll also be able to reduce the amount of the datasets are imported into Power BI Desktop and the number of modifications you have to do.

To take this technique, you’ll need to know how to utilize T-SQL, and if you do or can find someone who does, you’ll have a lot of flexibility when dealing with SQL Server data. Even if you extract data table by table, you still have a variety of powerful tools for interacting with SQL Server data & organizing it for use in Power BI visualizations. Whereas the Power BI service allows you to retrieve data from a variety of sources, it will not have a SQL Server data connector. One could export SQL Server files and then import them into the service, but you can’t connect immediately from service to SQL Server, regardless of the fact that SQL Server seems to play a crucial role in many organizations today. The more you know about importing and transforming SQL Server data in Power BI Desktop, the better.

Prerequisites to connect Power BI To SQL Server

  • Before you begin, join up for the free trial of Power BI, in case you do not even already have one.
  • On the local computer, install the Power BI Desktop.
  • Download SQL Server within a local computer and recover a backup of the demo database.
  • In the local computer as SQL Server, install the data gateway.
  • Consult a network administrator in the organization if you aren’t a network administrator and wouldn’t want to set up a gateway yourself. They’ll be capable of creating the data source configuration needed to link your dataset to the SQL Server database. Import Data connectivity mode must be used if you’re going to employ a saved procedure.

Step by Step approach to Connect Power BI to SQL Server

1. Power BI Desktop and installation

Power BI Desktop seems to be a free tool that you can download and install on your computer. It may link to a variety of data sources. Normally, an analytical project starts with report development in Power BI Desktop. The data is subsequently uploaded to the Power BI service, where it may be associated with the Power BI Mobile applications, allowing users to access the reports on their mobile devices.

Power BI Desktop and installation

Installation

Power BI is only available on Windows computers. Users on Macs may either create a Windows VM on Azure and install Power BI there, including using Turbo.net, that could broadcast Power BI instantly towards the Mac from either the cloud.

There are two ways to use Power BI:

  • We can download this from the Microsoft Store as an application and simply login in and get going. This would be the device’s digital equivalent.
  • We often have to operate with the information in offline mode. In these kinds of cases, download the software first rather than install it locally. Take the time to read through the entire installation guide.

Download the application to the system, based on the products you’ve chosen. Check the installation via selecting the Power BI Symbol after approving the license agreement. If the screen below shows, you’re ready to begin.

Power BI Symbol

2. Workspace

Let’s have a look at how Power BI Desktop works now. We’ll have a look at it in another part to get an idea of how it works.

The graphic below depicts the key characteristics of Power BI’s workspace..

Workspace

Click here to learn Power BI Tutorial

Power BI Training

  • Master Your Craft
  • Lifetime LMS & Faculty Access
  • 24/7 online expert support
  • Real-world & Project Based Learning

3. Data Source

A variety of data sources could be connected to Power BI. The Get Data button toggles all of the data sources that may be used to import data into Power BI.

Data Source

4. Connecting to SQL Server

Let’s look at an example of connecting a SQL server dataset to Power BI Desktop and using that to examine the data.

Database Example

We’ll have to use a publically available SQL Server installation on AWS for the demonstration, as well as a database built from the Superstore dataset.

Our goal as Data Analysts would be to assess the data and identify significant areas of concern inside this hypothetical firm. 

Getting into the sample database

SQL Server Management Studio should be installed (SSMS). SSMS seems to be a free and fully integrated management environment for every SQL system. SSMS allows you to install, manage, and modify the data-tier components that your applications rely on, and also create inquiries and workflows.

After you’ve downloaded and installed the software, you’ll see the page below, which will prompt you for particular credentials.

Connecting to SQL Server

1. Insert the given information:

Server Name: ec2-52-14-205-70.us-east-2.compute.amazonaws.com

Authentication: SQL Server Authentication

Login: SQL

Password: SQL

The ‘SuperStoreUS’ database will indeed be accessible as a ‘Read Only’ user. As our sample, the instance is ec2–52–14–205–70.us-east

2. compute.amazonaws.com, the databases are SuperstoreUS and Test, and the tables inside the SuperstoreUS database are Customers, Orders, and so on. As a result, there could be lots of instances, each of which can have multiple databases, each of which would contain various tables.

SQL Server Authentication

5. Importing SQL data into Power BI

The data is organized into searches by Power BI Desktop. It implies that all of the information is organized in a table-like format.

Making the connection

Proceed to the start button by opening Power BI Desktop. The Get Data tab pane gives you a number of options when it comes to sources of data that could be linked to the Power BI Desktop. We’ll establish a connection to the SQL Server.

connection to the SQL Server

When you select SQL Server, a fresh screen will appear, asking again for the server with which we wish to connect our Power BI Desktop. Fill in the blanks, and you’re finished. We could now inspect the details of the selected table by clicking on it. For uploading a certain table, merely check the box beside it click the load button.

SQL Server

Modes of Data Connectivity

Power BI Desktop may link to a SQL database in two distinct ways, both of which display on the homepage.

Import

The import technique, as the title suggests, ‘imports’ the chosen tables onto Power BI Desktop. The imported data is therefore used by Power BI to create a visualisation or perform any adjustments. We must reload the data to view any modifications in the data, which re-imports the full data set.

DirectQuery

No information is incorporated or transferred to Power BI Desktop if DirectQuery is selected as an option. Power BI Desktop searches the fundamental data source while we generate or process the information through visualisations, ensuring that we’re still dealing with the most recent data. Nevertheless, unlike the importing method, this approach has restricted data processing capabilities.

Power BI Desktop

6. Query Editor

All of the chosen tables would be imported into Power BI Desktop & displayed in the Data view as distinct datasets. .

Query Editor

We can make changes to our datasets from here. We’ll use the Query Editor to accomplish this. The query generator could be used to edit datasets regardless of the data source. The query editor allows us to perform operations such as rebranding a dataset, eliminating a single or several columns, and so on.

 rebranding a dataset

The number of functional inquiries is displayed on the left pane, while the Query Settings pane on the right provides all of the stages related with a query.

Advanced  Editor

The script for the inquiry that has been run against the source of data is displayed in the Advanced Editor. The syntax is M, which stands for Power Query Formula Language. It is also possible to write your own code.

Make a backup of your work

Choose Close & Apply from the Query Editor’s File menu once you’ve made the appropriate data changes in the query editor. The adjustments will be applied to the data in Power BI Desktop.

data in Power BI Desktop

 Top 50 frequently asked Power BI Interview Questions !

Business Intelligence & Analytics, powerbi-with-sql-server-description-4, Business Intelligence & Analytics, powerbi-with-sql-server-description-14

Subscribe to our YouTube channel to get new updates..!

7. Merging Datasets

When we wish to integrate one or maybe more datasets into one, merging datasets proves useful. The Query Editor can also assist with this merger. We’ll pull multiple tables(3) from the SuperstoreUS database this time.  Customers, Orders, and Returns are the three tables.

Merging Datasets

The three specified tables are listed in the Fields column. Now, go to the Edit Queries option and click the Combine option from the dropdown menu, which will reveal the Merge option. We’ll use the merged existing queries to construct a new query.

Merge option

We pick the tables to be combined as well as the kind of join we need in the Merge dialogue box. Columns that are similar to both tables must be chosen.

Let’s start by creating a new query called Orders and Customers. Through this query, we’ll join the Orders and Customers tables. All of the key columns from the orders table, as well as correlation columns from either the customer’s table, were included in the new query. Except for the last one, which reflects the Customers query, eliminate all the correlation columns. Next, from the Customers query, choose columns to merge into the newly merged query.

Customers query

The merged query is composed of a single database that has all of the required columns. Rather than operating with several data sources, which might cause confusion, you could now easily interact with one single database.

8. Building & Publishing a Dashboard

We may begin the Dashboard construction process since we had the dataset prepared along with all the alterations completed. The Power BI dashboard often referred to as a canvas, is a single sheet that contains multiple visualizations that serve to convey a narrative. The reports’ visuals, known as tiles, are attached to the dashboard.

Now just to see what recommendations we can glean from the superstore data set.

  • States seeking profit
  • Profit & Sales by Segment

Building & Publishing a Dashboard

Region-by-Region Sales and Profit

Sub-Category Sales

Profits by location

Quantity

We’ll obtain a dashboard that looks like the one below after we’ve formatted the size, look, and colour.

dashboard

Publishing
Data would be only valuable if it can be transferred across individuals or groups. By publishing the Dashboard or reports to the Power BI Service, they can be shared with others. The Dashboards/Reports can then be seen or interacted with using the Power BI Apps.

Publishing

Power BI Training

Weekday / Weekend Batches

Conclusion:

When SQL and Power BI are combined, data analysis is carried out properly. We can integrate SQL Server to Power BI with ease and retrieve information right into it. Customers can switch connections with a single click in Power BI to execute in-memory searches to a bigger dataset. SQL is a handy tool that, when combined with Power BI’s expertise, may assist in monitoring and reporting more effectively and informative.

Related Articles:

  1. KPI in Power BI
  2. Looker vs Power BI
  3. MSBI vs Power BI


Source link