
[Python Flask] Python Flask Tutorial for Beginners


Python flask

Flask is a lightweight web application framework provided by python. A web application framework represents a collection of libraries that help in building web applications quickly. The web applications can be of web pages, or it can range to complex commercial applications. It does not have a database abstraction layer. It is developed by Armin Ronacher of the ‘Pocoo’ and released initially on April 1st, 2010. It initially began as a wrapper around Werkzeug and Jinja projects.

Werkzeug – It is a WSGI (web server gateway interface) utility from python.It is an interface between the web server and the web applications. It provides useful functions and classes for the WSGI application.
Jinja – It is a templating language for python. It comes with an optional sandboxed template execution environment.It is similar to the Django template. We can create HTML, XML, or other markup formats.

The latest stable version (1.1.2) release of python flask is on April 3rd, 2020.It is voted as the most popular web framework in the Python Developers Survey 2018.It has a lot of stars on GitHub than Django and other python web application frameworks. Flask doesn’t enforce any dependencies.

Become a Python Certified professional by learning this HKR Python Training !

Advantages of Python flask

Flask offers a variety of benefits, that’s why the developers like to work with Python flask. Let’s look at some of the benefits of the flask.

  • Flask is easy to use and read. So the developers can easily understand the code written by other programmers.
  • It is a microframework and has a modular design, so it is easy to transit.
  • It allows quick prototyping.
  • We can scale up to creating complex web applications.
  • It handles HTTP requests.
  • It provides better performance.
  • It has a built-in development server.
  • It provides support for secure cookies.
  • We will have more control over the application development.
  • It supports integrated unit testing.
  • It uses Jinja templating.
  • We can plugin our favorite ORM.
  • It supports a lot of extensions that we can add to any application features that we like.
  • It is WSGI 1.0 compliant, so it is easier to deploy flask in production.
  • We will have more flexibility in configuration.

What are APIs?

An API is short for Application Programming Interface. Computer programs have to communicate with other programs or with the underlying operating system. This is when we require APIs to establish communication. An API is a computer program that allows manipulating information by another program over the internet. We can share data with other users through APIs. Here are some keywords to remember while creating APIs.

HTTP (Hypertext Transfer Protocol) – It is the primary means of data communication over the web. It has methods that specify the movement of data direction. 

URL (Uniform Resource Locator) – It represents the address of a resource on the web. It consists of a protocol, domain, and an optional path. 

JSON (JavaScript Object Notation) – An API return data in the form of JSON. It is a data format that is easily readable by users and machines.

REST (REpresentational State Transfer) – It represents the best practices for implementing APIs.The APIs that follow REST principles are called REST APIs.

HTTP methods

HTTP request methods indicate the action to be performed on a resource. We have to specify which HTTP method should handle the request in the flask route function. Let’s look at the different HTTP methods.

GET – It sends data in the form of unencrypted to the server. It is the most commonly used method. The flask route responds to GET requests by default. It only retrieves data from the user.
HEAD – It functions the same as the GET method but without a request body.
POST – We can use POST to send form data to the server. The server cannot cache the received data.
PUT – It replaces all the current representations of the target resource with the request payload.
DELETE – It deletes all the current representations of the target resource.

Top 30 frequently asked Python Interview Questions !

Python Training Certification

  • Master Your Craft
  • Lifetime LMS & Faculty Access
  • 24/7 online expert support
  • Real-world & Project Based Learning

Creating your first flask application

First, make sure that python is functional in your system. Open command prompt and type in python.You should be able to see the python version and other information. You will also be in an interactive prompt where you can execute python code. Let us create a simple flask application.

In python, all the application code will be present in a subdirectory and should include an ‘ __init__.py’ file. The __init__.py file is a package that can be imported and executed. Create a project folder with ‘SampleApp’ as the name. Create a new file in your favorite text editor and paste the following code in it.

#Import flask module into the project 
from flask import Flask

#Create a flask object
app = Flask(__name__)

#URL mapping of the associated function
@app.route("https://hkrtrainings.com/")

#Specify the server response to return
def first_application():
return 'Welcome to the HKR Trainings'

#The main driver function
if __name__ == '__main__':
#Run the application
app.run()

You can find comments in the code that explains every line. Save the file with name as script.py. Open the command prompt and navigate to your project folder using the below command.

cd

Give the below command to run your application.

python script.py

You can see the logs of the application on the command line. It will show the URL on which the application is running too. The URL will usually be http://localhost:5000. Open a browser and run http://localhost:5000. You should be able to see a message that says ‘Welcome to the HKR Trainings’.

Related Articles: Python operators !

Big Data Analytics, python-flask-tutorial-description-0, Big Data Analytics, python-flask-tutorial-description-1

Subscribe to our YouTube channel to get new updates..!

Creating an API

Now that you know how to create and run a python application. Let us create an API that can return some information. Let us add our training tutorials as a list of python dictionaries. Dictionaries in python will be of key-value pairs. Each dictionary should have a unique id through which it can be identified.

Create a new project with ‘TrainingLinks’ as a name. Open a new file in a text editor and paste the following code in it.

import flask from Flask 
import request, jsonify

app = Flask(__name__)
app.config["DEBUG"] = True

tutorials = [
{'id': 0,
'Name': 'ELK Stack Tutorial',
'Link': 'https://hkrtrainings.com/elk-stack-tutorial'},
{'id': 1,
'Name': 'Tosca Tutorial',
'Link': 'https://hkrtrainings.com/tosca-tutorial'}
]

@app.route("https://hkrtrainings.com/", methods=['GET'])
def home():
return 'Welcome to the HKR Trainings'

@app.route('/api/v1/hkr/tutorials', methods=['GET'])
def api_all():
return jsonify(tutorials)

app.run()

Run the application from your command prompt. Now when you open a browser and run http://localhost:5000. You should be able to see a message that says ‘Welcome to the HKR Trainings’. When you navigate to http://localhost:5000/api/v1/hkr/tutorials, you can see the list of tutorials that we have included in the code.

[ Related Article: elk stack tutorial ]

Python Training Certification

Weekday / Weekend Batches

Conclusion

Flask enhances the development of complex web applications. App routing is the most important part of python flask,as it maps the application to specific functions.We can create APIs for data present in files, databases, etc. Flask provides extensions for Mail,WTF, SQLite, SQLAlchemy,and many more.With flask,we can create web applications very easily without putting much effort.Companies like Netflix, Reddit, MailGui are using flask for building their web applications.

Related Articles:


Source link

Leave a Reply

Subscribe to Our Newsletter

Get our latest articles delivered straight to your inbox. No spam, we promise.

Recent Reviews


Introduction to SAP SD (Sales and Distribution):

SAP SD (Sales and distribution) is one of the significant functional modules of any enterprise resource planning (ERP). The SAP SD module helps in the bills management, shipping, services, transportation, and selling of the products. This functional module is closely integrated with other modules like Material Management (MM), product planning (PP), and logistics. 

 Become a SAP SD Certified professional by learning this HKR SAP SD Training !

SAP SD: creating master and material data

Master data management is a key factor in the SAP sales and distribution functional module. 

Primarily, there are two levels of master data available they are;

First, let’s discuss the first level;

   a. Customer master data.

   b. Material master and 

   c. Pricing conditions

Now discuss the second level;

It includes only;

Output conditions

It’s time for us to know how to create customer master records;

In general, the master record consists of information about the business transactions and also information about the customers where the organization uses this information to collaborate with them. 

Let us know the important transactions being used in the creation of customer master records.

  • XD01, XD02, and XD03 -> used to create/ modify/ display the customer data.
  • VD01, VD02, and VD03 -> used to create/ modify/ display the sales data.
  • FD01, FD02, and FD03 -> used to create/modify/ display the customer company code.
  • XD04 and XD05 -> display the change document and used to block the customers (global orders, delivery, and billing, etc).
  • XD06 and XD07 -> used for deletion of unwanted data and create contact person details.

To create a master data all you need to do is use an account group;

  • Use the T-codes XD01, VD01, and FD01.

*Note: XD01 -> this includes the sales area details, and that will be stored in the tables like KNA1, KNVV, and KNB1.

             VD01 -> this includes the sales data and no company code data will be included.

              FD01 -> this includes all about the company code levels, and the data will be stored in the tables KNA1 and KNB1.

  • The steps included are, 

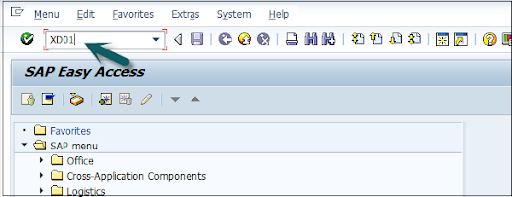
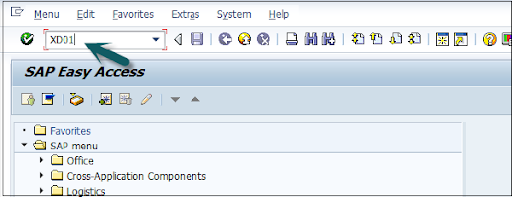
Open the SAP editor, then enter the T-code “XD01”, as shown below;

XD01

  • Then the new window will open, enter the following details;

               a. First, choose the account group from the given list

               b. Enter the customer number and select the proper company code.

  • Now enter the sales area details like;   

              a. Sales organization 

              b. Distribution channel 

              c. Various divisions details.

  • Once you have entered all the details, click on “Tick mark” as shown below;

Tick mark

  • In the next step, enter the general details like title, name, address, company code data, and sales area data, etc.

enter the general details

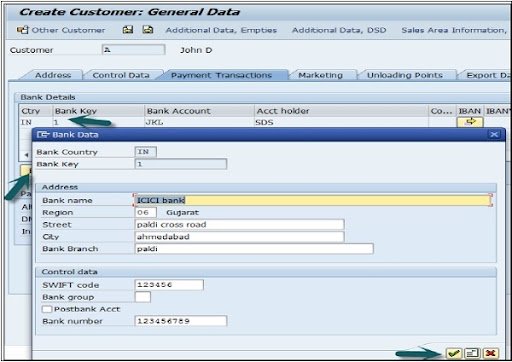
  •  The next step is to add the control data details, and the image as given below;

control data details

  • Now go to the sales area details and enter the details like shipping data, partner function, and customer pricing, etc.

sales area details

  • Click on the “save” button to view the customer details;

save data

Top 30 frequently asked SAP SD Interview Questions !

SAP SD Training

  • Master Your Craft
  • Lifetime LMS & Faculty Access
  • 24/7 online expert support
  • Real-world & Project Based Learning

SAP SD: creating partner function

The partner function in SD allows users to identify which partner functions need to be performed with the business process. Consider a simple example; when all the customer functions are performed by partner function, this process is known as an obligatory function in Sales and distribution.

Related Articles SAP SD Modules !

All the partner functions can be categorized on the basis of a partner type. The partner types can be named as;

1. Partner type customers consist of four sub-modules;

        a. Sold to party type

        b. Ship to party type 

        c. Bill to party type 

        d. Payer 

2. Partner type contact persons 

3. Partner type vendors 

4. Forwarding agents 

5. Employee responsible 

6. Sales personnel type 

7. Partner type personnel

Related Articles SAP SD Flow ! 

In the below section, we would like to mention a few important partners type and their core functionalities ;

Customer type -> Sold-to-party 

                             Payers 

                             Ship-to-party 

                             Bill-to-party 

Vendors type -> Forwarding agents (fwdg agents)

Human resource type -> Employee responsible
                                       Sales personnel 

Contact person types -> contact person (CP)

Now it’s time for us to know how to create the partner functions;

The steps included are;

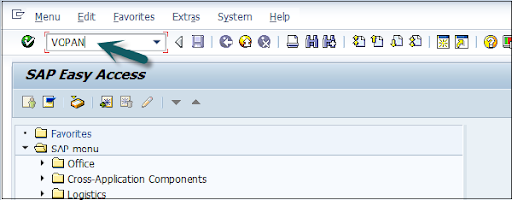
  • First, go to the SAP Access window -> type the T-code VOPAN as shown below;

VOPAN

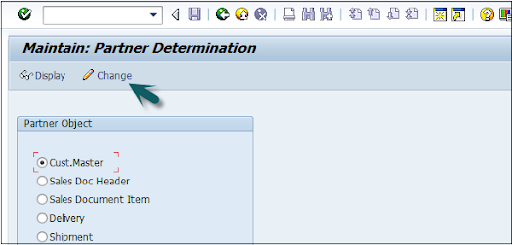
  • Then a new window will pop up -> select the partner type -> then click on the change button.

select the partner type

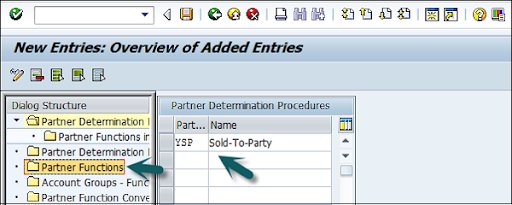
  • This window also opens the new browser -> click on the partner determination procedures -> click on the partner function that is available on the left panel as shown in the below image;

click on the partner determination procedures

  • Click on the new entries;

Click on the new entries

  • The last step includes entering the general information like name, type, and customerd

entering the general information

  • Now click on the “Save” button to save all the details which you have entered. 
SAPS, sap-sd-tutorial-description-6, SAPS, sap-sd-tutorial-description-12

Subscribe to our YouTube channel to get new updates..!

SAP SD: Creating a material stock

Suppose you have already adopted SAP in the organization and now it’s time to add all your stock in the Sales and distribution module. 

The steps included creating a material stock;

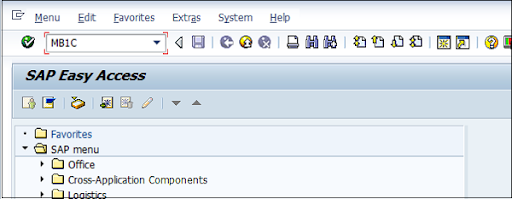
  • Use the transaction code MB1C and movement type 561 to receive the purchase order.

MB1C

  • Now a new window will pop up, enter the date, storage, plant, and movement type details as shown below;

new window

  • Now select the movement as per your requirements-> click enter as shown in the below image;

movement as per your requirements

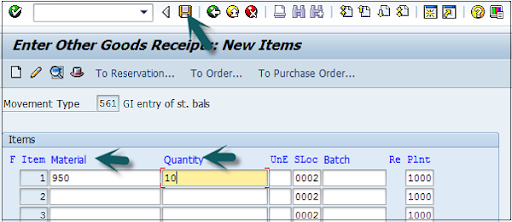
  •  A new window will pop up, now enter the material code ->create the quantity for the stocks -> click save as shown below;

create the quantity for the stocks

  • Finally, a material document with a stock number will be displayed.

SAP SD Training

Weekday / Weekend Batches

SAP SD: pre-sales order activities 

All sales order activities can be divided into pre-order and post-order sales activities. Pre-order sales take place before the product is sold out and post-order sales take place after the product is sold out. 

There are two types of pre-sales order activities that take place, they are;

Related Articles SAP SD Tables ! 

Inquiries 

Inquiries are nothing but questionaries about if the product is available or not, the cost of the products, and the delivery of the product. 

The t-codes which are used to perform inquiries;

1. VA11: Create inquiry logistics -> sales and distribution -> sales -> inquiry -> create.

2. VA12: Change inquiry

3. VA13: display or inquiry search

Quotations:

A quotation is a legal document or blueprint, which enables customers to know about the products or services. 

The following are the T-codes used to create the quotations:

1. VA21: Creating a quotation.

2. VA22: Changing of quotation.

3. VA23: display or quotation search

First, let’s start with creating inquiries:

Foremost, an inquiry is not about the blueprint or a document, but it is all about information that is related to products or materials, and goods quality.

The navigation is as follows:

First, go to the logistics -> sales, and distributions -> click on “sales” -> Inquiry -> create a T-code (VA11).

Note: when you use this T-code, create the below details to access this t-code.

Inquiry type -> ZEC 1 (IECPP inquiry)

Sales organization ->  4000

Distribution channel -> 40

Division ->  00

The steps included are;

  • Open the SAP easy access menu -> enter the T-code VA11 as shown below;

VA11

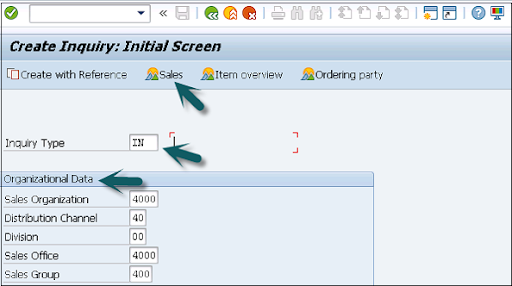
  • Now enter the Inquiry type as “IN” -> then organizational details -> click on save button as shown in the below image;

organizational details

  • Now the new window will pop up -> enter the partner functions such as; sold-to-party and shift-to-party -> enter the material code -> quanity details -> click save.

sold-to-party and shift-to-party

A message like inquiry type “123456789” will be created and displayed. 

Benefits of using SAP Sales and Distribution:

{ Related Articles: SAP SD Training in Pune }

The following are the benefits of using SAP sales and distribution;

  • SAP Sales and distribution helps to track the overall sales distributions.
  • Helps to track organizational sales data along with the team performance.
  • Recording pre-order and post-order sales activities.
  • Define the important process for the sales and distribution methods.
  • Helps users to categorize the diverse sales and distribution process.
  • Offers effective management in order to manage the material management, pricing, and stocks.

Conclusion:

From this article, we can consider that Sales and distribution is an important functional module. In every ERP based organization, they prefer to adopt Material management along with sales and distribution to manage/track the overall sales. I hope this SAP SD tutorial may help a few SAP communities to learn, and explore the basic sales knowledge. 


Source link