Best Western Rewards members, rejoice — you can now experience the great outdoors on points.
WorldHotels, an independent luxury and lifestyle brand within the Best Western portfolio, has announced the launch of a new collection of upscale glamping and outdoor properties called WorldHotels Backdrop.
These properties offer luxury glamping accommodations, from cabins to covered wagons to safari-style tents — so that guests can book a relaxing nature retreat without sacrificing comfort. They often feature additional amenities like fire pits and onsite recreation areas. And Backdrop properties are located in scenic destinations around the world, with easy access to top outdoor attractions and activities like national parks, hiking trails and wildlife hotspots.
The Backdrop collection is still relatively small, with only three properties currently listed: Zion Wildflower Resort in Utah, Asheville River Cabins on the banks of the French Broad River in North Carolina, and The Lodge at Pico Bonito (coming soon) near Honduras’ Pico Bonito National Park. However, a press release hinted at plans to expand to places like Phan Thiet, Vietnam, African safari destinations and Australia.
Even better, because WorldHotels is part of the Best Western Rewards program, you’ll be able to stay at these unique places on points. Redemptions are already available online.
Reward your inbox with the TPG Daily newsletter
Join over 700,000 readers for breaking news, in-depth guides and exclusive deals from TPG’s experts
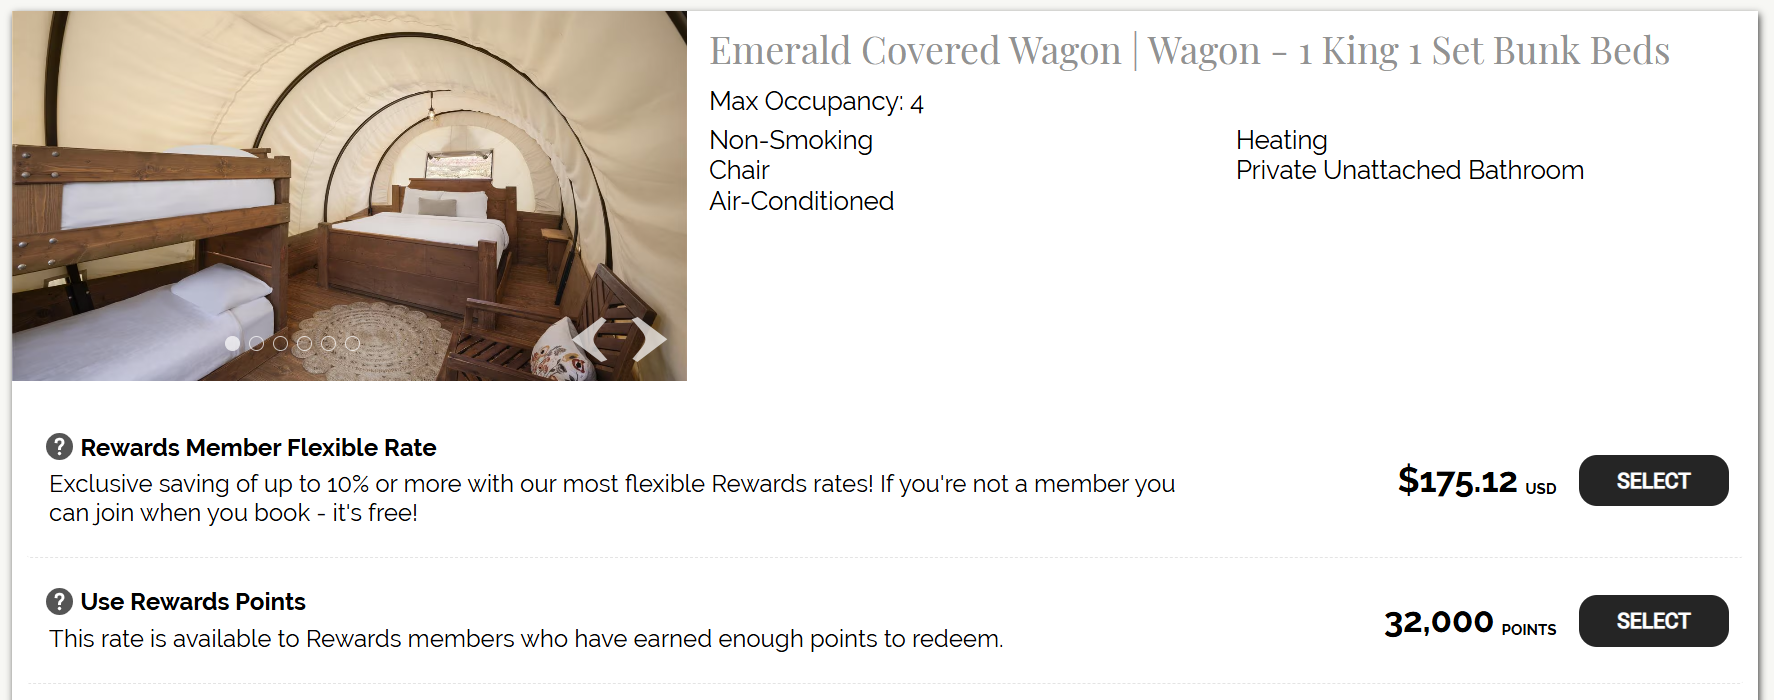
For instance, you could spend a night in this covered wagon at Zion Wildflower Resort, just minutes away from Zion National Park, starting from $175 or 32,000 points. You could take the hotel’s complimentary shuttle to the national park for a day of exploring, then retire to your covered wagon at night for some stargazing, s’mores and a soak in the outdoor hot tub — all with stunning views of Utah’s red rock country.
WORLDHOTELS
Best Western is a popular choice for road trippers and national park visitors, so the addition of Backdrop makes a lot of sense. But this isn’t the first hotel chain to incorporate glamping and outdoorsy brands. We’ve seen Hilton, Hyatt and Marriott do the same in recent years, part of a larger trend of hotel loyalty programs incorporating more unique and boutique properties.
Here at TPG, we love saving money by booking lodging with rewards — especially now that airfare is on the rise. And with more outdoorsy lodging options becoming bookable with points, adventurous award travelers have more options than ever.
Now that WorldHotels has joined the glamping game, Best Western loyalists will be able to earn and burn points on unforgettable nature stays.
Row level security in Power BI is mainly developed to restrict the data access and also secure them. In row level security, you will get a filter that restricts the data access only at the row level. With the help of row level security in Power BI, you can also define the filters along with roles. One more point to be remembered, if you are working with the Power BI tool, you should be very careful this is due to the Power BI services and members of BI workspace need to access the datasets within their workspaces. Row level security does not restrict this type of data access.
The advantage of using this Power BI enables you to configure the row level security for data models, then import them into the Power BI tool by using the Power BI desktop. Users can also configure this type of row level security on datasets which use Direct Query programs; SQL servers, and RDBMS. With the previous version of Power BI software, you were only able to implement row level security within the On-premises data analysis service model outside the power BI software tool. To perform data analysis you need to have live connections, and the security options will never show up the live connection data sets on-premises.
Defining roles and rules in row level security in Power BI desktop:
I think this is an important task; you should define the roles and rules within the Power Business Intelligence desktop. Then you also publish the definitions of the roles. This is an important task of the row level security in Power BI to define the data security roles. To perform this type of roles and rules, we have to follow the below steps:
The steps included are:
1. First you need to import your power business intelligence desktop –> then configure the Direct Query connection.
Point to remember: You can’t define the roles within the Power BI desktop for data analysis services using live connections. All you need to do is perform data analysis services within the analysis model.
2. Then select the Modelling tab.
3. Now you need to select the Manage Roles tab.
4. Then click on the “Create” button to create the new role.
5. It’s time to provide a name for your new role.
6. Now select the database table that you want to apply DAX rules in your database connection.
7. Users need to enter the DAX expressions. This type of expression should return a Boolean result (True or false).
For example: [Entity ID] = “value”.
Note: You should use the username () with the given expression. You should be very careful that while defining the username () consists of a format of DOMAIN username within the power Business intelligence desktop.
8. Once you have created the DAX expression-> then you need to select the Check box above the expression box to validate the Boolean expression.
Note: While defining the Boolean expression box, you have to use commas to separate the DAX functional arguments and also make use of semicolon separators.
9. Then finally click on the “Save” button.
Users can’t assign the roles within the Power Business Intelligence Desktop. Users are also able to define the dynamic security along with the Power business intelligence desktop by using the expressions like username () and userprincipalname () DAX function expression.
By default, row level security in the Power BI filter makes use of single-directional filters, and you can also set the relationships in a single-direction or bi-directional connection. You can manually make use of a bi-directional connection cross filter to select the relationship and check the “Apply row level security in both the directions” checkbox. And you have to check this box to implement dynamic row level security in BI at the server level, and where you can define the row level security is based on the user name and login ID.
How to validate the rules in Row level security in Power BI:
Once you are done with the creation of the role, you need to test the results of roles available within the Power Business intelligence desktop.
The following are the important steps involved to validate the rules used in Power BI:
The steps included are:
1. First you need to select the “view as roles” as shown in the below screenshot,
In the “View as roles” tab, you can also see the roles which you have created as shown below;
2. Now select the role which you have already created -> then click on the “OK” button to apply for the roles. Here the report renders the data relevant to define the roles.
3. Now you need to select the “other user” button -> then supply it for a given user. It’s always good to supply the user principal name (UPN) to define the Power BI service and Power BI report services use as shown below:
4. Then click on the “OK” button and report the data renders based on what you can see on the Power BI desktop.
Within the power business intelligence desktop, other users (Non –users you can also say) are able to display the different results suppose if you are working with dynamic security based on the DAX Boolean expressions.
Subscribe to our YouTube channel to get new updates..!
How to manage row level security on your data model:
To manage the row level security on your data model, you have to follow the below steps:
The steps included are:
1. First you need to select the Ellipse (….) for the given data set.
2. Then click on the Security button. The below screenshot will explain this;
This will directly take you to the RLS page -> then you can add members to define the role created in your Power business desktop. Only the authorized owner of the given data set is eligible to see the security. Suppose if the dataset is available in the group, then only administrators of the group can see the security option.
You can only create or modify the row level security page on the Power BI desktop.
Working with members in row level security:
The following are the few steps included in performing this process:
1. You can add members to the roles in Power BI just by typing them in the email address, or provide the name of the user, security group details, and distribution list.
Note: you cannot add user groups that are created within the Power BI. So you should add the members external to your business organization.
The below screenshot will explain this;
2. You can also able to see how many members are parts of the roles in a given Power BI desktop with the given role name or next to members as shown below:
Remove members from roles:
You can also remove the members just by selecting the “X” next to the user name as shown below:
Validate the role within row level security in Power BI:
To validate the roles follow the below steps:
1. First you need to select the ellipse (…) button which is next to the role.
2. Select the test data as a role as shown below:
Now you can able to view the reports which are available for the role. Power BI dashboards are not presented in the view.
The below screenshot will explain this scenario:
Enroll in our HCISPP Training program today and elevate your skills!
Power BI Training
Weekday / Weekend Batches
Conclusion:
We can say that Row level security in power business intelligence is one of the powerful security features available for both desktop and cloud services. In recent times, one more tool also developed to offer a security service that is popularly known as Microsoft Azure- a child product of Microsoft corporations. With the help of this row level, security feature users can also modify or view the data sets in connections and also enable users to create roles to perform new or modify the already existing data sets in the database. All the modified data sets will be stored in Direct Query data sets. I think we have tried to cover up all the sections which are related to Row level security in Power BI. So this blog may help a few of you to access the secured data and also protect the business data for future purposes.
To provide the best experiences, we use technologies like cookies to store and/or access device information. Consenting to these technologies will allow us to process data such as browsing behavior or unique IDs on this site. Not consenting or withdrawing consent, may adversely affect certain features and functions.
Functional
Always active
The technical storage or access is strictly necessary for the legitimate purpose of enabling the use of a specific service explicitly requested by the subscriber or user, or for the sole purpose of carrying out the transmission of a communication over an electronic communications network.
Preferences
The technical storage or access is necessary for the legitimate purpose of storing preferences that are not requested by the subscriber or user.
Statistics
The technical storage or access that is used exclusively for statistical purposes.The technical storage or access that is used exclusively for anonymous statistical purposes. Without a subpoena, voluntary compliance on the part of your Internet Service Provider, or additional records from a third party, information stored or retrieved for this purpose alone cannot usually be used to identify you.
Marketing
The technical storage or access is required to create user profiles to send advertising, or to track the user on a website or across several websites for similar marketing purposes.