Due to changes in bone structure, fat pads, and more, aging lips often look less defined and thinner. Credit: miniseries / Getty Images
Collagen and elastin decline starting in your 20s, reducing lip fullness and increasing fine lines around the mouth over time.
Age-related bone loss, reduced facial fat, and muscle changes can also make lips appear thinner and less defined.
The degree to which your lips lose volume depends on a number of factors, including sun exposure and genetics.
As you get older, your lips naturally lose some of their natural fullness and develop more noticeable lines. Here are four reasons why your lips may look different over time—and the factors that can either accelerate or slow lip aging.
1. Collagen and Elastin Production Slows Down
Over time, your body loses two proteins that can affect the appearance of your lips:
Collagen: This protein is responsible for giving the skin its structure and firmness. Collagen production peaks in your 20s, then declines by about 1% per year. For women, collagen loss accelerates significantly during the first five years of menopause, then declines more gradually after.
Elastin: This protein is essential for helping tissues stretch and bounce back to their original shape, but it also declines with age.
Together, collagen and elastin fibers support the lips and help them maintain their shape. But as these proteins break down over time, your lips can appear less full or droopier, and you may notice fine lines on your lips or around your mouth.
2. Bone Structure Changes
Many people associate aging with skin changes, but the bones in your face also change over time.
Bone resorption—the opposite of bone formation—is a natural process where bones lose some of their mineral content. As you get older, this bone resorption causes your mouth and jaw bones to recede slightly, so they're less able to support the tissues around the mouth. As a result, your lips may appear thinner, more droopy, or less defined.
3. Fat Pads Become Smaller
Your face contains pockets of fat beneath the skin, called fat pads, that help keep your skin smooth and plump.
Due to gravity and bone changes, facial fat tends to shrink and shift as you age. The loss of this underlying support may make the skin and lips appear flatter and less full. Fat loss can also cause age-related changes around the mouth, such as deeper smile lines, more wrinkles, and a less defined lip border.
4. Muscle Changes
Age-related changes to the muscles in your face can also alter how your lips look. There are two major drivers of these changes:
Natural weakening of muscle fibers: The main muscle that surrounds the lips, called the orbicularis oris muscle, gradually becomes smaller and weaker over time. As this muscle weakens and loses support, the lips may appear thinner, and wrinkles around the mouth may become more noticeable.
Repeated movements: You use muscles in your face to complete everyday movements, such as talking, smiling, drinking through a straw, whistling, or smoking. These actions form grooves or dents on the surface of the skin and lips, which can contribute to the formation of fine lines over time. Plus, overuse of certain muscles may cause the lips to appear more downturned.
Factors That Speed Up Lip Thinning
Aging affects everyone's lips, but certain lifestyle and environmental factors can accelerate some of these changes, including:
Smoking: The repeated movement of smoking can contribute to lines around the mouth. Plus, research suggests that people who smoke have thinner skin and less collagen fibers. This could be because smoking reduces blood flow in the skin and limits the body's ability to repair skin tissue.
Long-term exposure to ultraviolet (UV) rays: This can damage collagen and elastin in the skin.
Dehydration: Lips are prone to dehydration, and not drinking enough water can affect their short-term appearance.
Significant weight loss: People who have lost substantial amounts of weight may have a reduced facial volume, which makes lip thinning more noticeable.
Poor nutrition: Among many other things, your diet plays a role in your skin health. Not getting enough essential vitamins and minerals, or eating a diet very high in fats and sugar, may lead to inflammation and skin aging.
Genetics: Though there's little research on lips specifically, it's well-documented that family traits can play a role in skin aging in general. It's possible that the way your lips change over time may be similar to what you've seen in older relatives.
How To Keep Lips Looking Healthy as You Age
Age-related lip thinning is a normal part of getting older, and everyone will likely experience it to some degree—collagen loss, shrinking fat pads, and changes in facial bone and muscular structure cannot be completely prevented.
However, healthy habits may help you maintain or improve the appearance of your lips, including:
Using sun protection, including a lip balm that contains SPF
Applying moisturizing lip products, such as lip balm containing hyaluronic acid
Quitting smoking to prevent skin damage and premature aging around the mouth
Limiting repetitive motions, including drinking from straws
For people who want more noticeable changes, cosmetic treatments—such as dermal fillers—may provide additional improvement in lip volume and definition. If you want to explore treatment options, visiting a board-certified dermatologist or plastic surgeon is the right place to start.
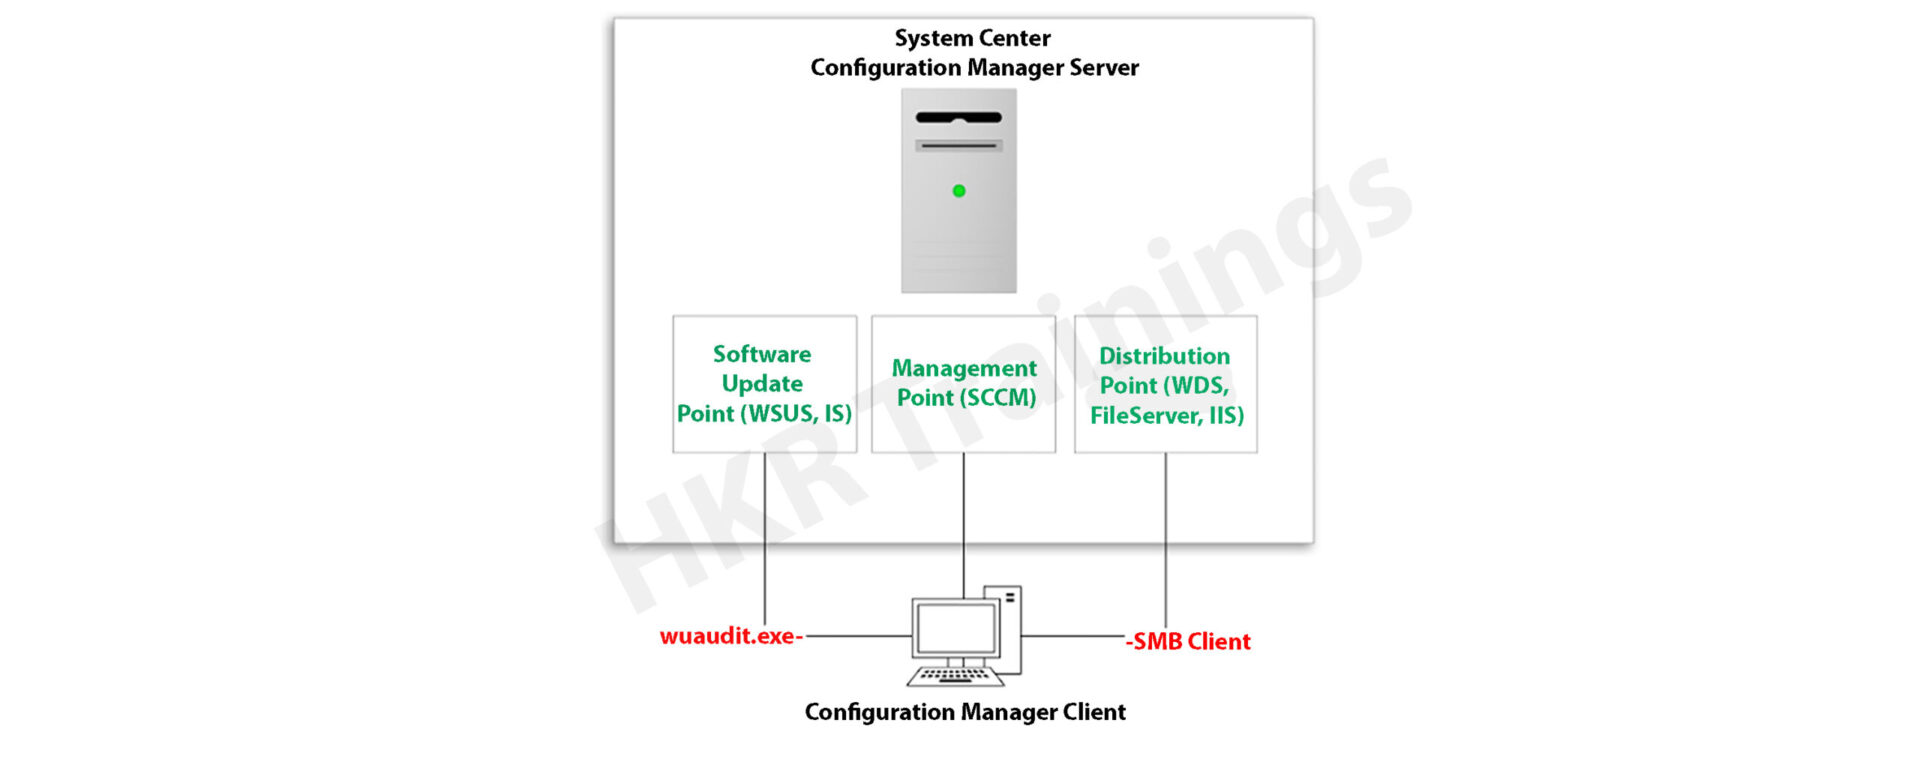
Microsoft System Center Configuration Manager (SCCM), a modern product from Microsoft, is designed to streamline the management and updating of software products. SCCM stands out for its highly adaptable, automated approach to deploying and configuring various devices, including desktops and laptops, starting from any initial state, such as bare-metal deployments. This tool empowers IT admins by offering an end-to-end solution for Windows installation and configuration. It simplifies the delivery of apps, patches, and security updates through a unified distribution system.
A standout feature of SCCM is its capacity to manage many computers running various OS like Windows, Linux, UNIX, and iOS, demonstrating its versatility in diverse IT environments.
The installation process for SCCM 2012 R2 is outlined in a series of steps crafted to simplify the user experience. The process begins with setting up the primary server and accompanying SQL server, typically housed on the same device.
Step1: Prepare active directory for configuration manager
a) Create the system management container:
Please navigate to the domain controller, load the ADSI file, and edit it. In the system OU, create a new object named ‘System Management.’
Complete the wizard, closing the ADSI editor. Grant control of the system to the configuration system server for the new system configurator object.
Choose the container and click next.
Enter the name of system management and click next
b)Complete the wizard browser and close the ADSI editor.
Now pass the system control to the configuration system server to the newly created system configurator object, this can be done by using the navigation, choose the folder -> existing object -> create the new objects.
Check all the boxes (use the right tick) and complete the browser wizard.
Step2: Extend the system configuration Schema:
Navigate to \SMSSetup\bin\x64, accessing the folder controlling the system schema rules. Ensure the account used is a member of the AD admins’ group. Run Extadsch.exe as an admin and verify the successful extension in the Extadsch.log file.
Log into Extadsch.log file-> it will take you to the root, C: Drive. Check for the entry then you will notify with a message as “successfully extended to the active schema director”.
<02-02-2013 23:21:22=””> successfully extended the schema directory.
To check the activity of extadsch.exe -> go to the directory file “ConfigMgr_ad_schema.idf” that is located in the same folder in the system.
Step 3: Install the Site server prerequisites:
Essential SCCM site server management components include BITS, Remote Differential Compression, .NET Framework 3.5, and IIS components.
a. BITS
b. Access the remote differential compression
c. .NET framework 3.5
d. IIS components.
Step 4: Install the window assessments and Deploy kits (Windows ADK):
Download ADK 8.1 and follow the installation steps, including running the adksetup.exe file, accepting licenses, and choosing components like User State Migration Tools and Windows Deployment Tools.
a. Run the executable file adksetup.exe file -> accept the license agreements -> it will download and install the.Net framework 4.5.
Now restart the system when you accessed,
If you have any doubts on SCCM, then get them clarified from SCCM Industry experts on our SCCM Tutorial !
SCCM Training
Master Your Craft
Lifetime LMS & Faculty Access
24/7 online expert support
Real-world & Project Based Learning
After that system setup will resume-> accept the default location-> click next.
Select to join the CEIP -> click next
Now accept the license agreements
Install the component and click the “install” button
User state migration tools
Windows deployment tools
Windows pre installment environment (windows PE).
Once they complete the installation and click close.
Subscribe to our YouTube channel to get new updates..!
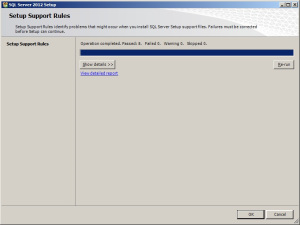
Step 5: Install the SQL server:
For the SCCM database, install SQL Server 2012 by running the setup.exe file and following the installation wizard.
Run the executable file -> setup.exe
Install stand-alone SQL database server
Click OK-> it will open the new browser;
Install the product key -> run in evaluation mode -> click next
Accept the SQL license agreement -> click next -> add any product updates-> click next -> now it’s time to choose the installation features -> click next
Set SQL to run with adding an appropriate domain name, network service, and local system account.
Step6: Install the SCCM R12:
Execute the splash.hta file and follow the guided installation process. It includes selecting the primary site installation, entering the license key, and configuring SQL database server settings.
1. Run the splash.hta -> click install
Now click next
Choose to install the primary site-> click next
Enter the license key->click next
Now accept the license key -> click next
SCCM Training
Weekday / Weekend Batches
Accept the pre-required license agreement->click next
Create any file solder to store the installation updates and Store the SCCM executable file in any folder-> click next
Updates will download -> installation begins-> select any language for the SCCM server-> click next.
Choose any client language-> click next-> enter the 3 digit site code and add the description.
Choose to run SCCM installation as a stand-alone -> click next
Click yes to accept -> select the default database server configuration-> click next.
Now specify the path to store the SQL database server and log files-> click next to set the current server -> set the configure the communication on each site system role”-> next install both MP and DP -> site server -> SCCM will begin the installation-> close the browser when it completes.
Launch the SCCM console -> make sure that all the database entries you have done are right -> start monitoring the workspace -> site status.
This finishes the installation process of SCCM.
Functionalities of SCCM:
The updated version of SCCM software adds much functionality to the applications. Let me explain them one by one;
Site infrastructure:
Supports Microsoft Office 365 file updates and features keyboard shortcuts for easy navigation within the configuration manager.Under the site infrastructure we can see the following features;
Site infrastructure’s client peer cache will support the updating of files for Microsoft office 365 and distributed express installed files for configuration of Microsoft Windows 10.
With the addition to this, there are few functionalities available such as,
Ctrl + D -> this keyword indicates the detailed panel
Ctrl +I -> this keyword indicates the breadcrumb bar
Ctrl + L -> this keyword indicates the search field
Ctrl + M -> this keyword indicates the main central panel
Ctrl + T -> this indicates the top node in the navigation panel.
This central administration site and primary configuration sites both include the configuration manager updates. Rest tolls will be used for downloading or replicating problems.
With the help of this update, the configuration console manager can be measured and display them on the user interface applications.
Include various device settings adjustments, such as password encryption, name modification, and storage settings.
The settings are as follows;
Password -> device encryption
Device ->
Modification of device name
Modification of region settings (only desktops)
Language setting modifications
Modification of power and sleep settings
Modification of system time and language settings
Storage -> it uses only the private storage
Auto-update available for the apps
Available store-oriented app launch
Application management:
It facilitates script deployment for client device management, including PowerShell script integration and result analysis.In this application management configuration setting, users can deploy the scripts to manage the client devices in the form of packages and programming codes. The following actions included are,
Users can run the script on-premises managed windows and windows client PCs.Here no need to deploy the scripts, they only run in real-time client devices.
Importing of PowerShell scripts to the system configuration manager
Edit the whole script from the system configuration console.
Need to mark the scripts whether it is approved or denied
Finally, examine the results which will return the script in the configuration manager console.
Operating system deployment:
Collapsible task sequence groups: this deployment version will expand and collapse the task management, sequence groups. Here user can expand or collapse all the groups or individual groups at once.
Hardware inventory collects the secured boot information: this hardware inventory collects information such as client enabled boot data. This information will be stored in the SMS_firmware class and enabled in the hardware inventory by default.
Software updates
Improvements to express the update download time:
Features improvements in express update download times, Microsoft Surface driver updates management and configurations for Windows Update for Business deferral policies.
Manage Microsoft Surface driver updates:
Here user can use the configuration manager to manage any Microsoft software driver updates.
Configure Windows Update for Business deferral policies:
Now you can configure the whole deferral policies for windows 10 quality features and also quality updates for the windows 10 software devices. This will manages the windows updates directly which will be used for the business later. You can manage the business referral policies in any newly updated system as follows; Software library -> Windows 10 servicing.
Improved user notifications for Microsoft office 365 Updates:
Improvements will be made to leverage the Microsoft office click-to-run user experience when a client installs new office 365b software updates. This update should consist of pop-up and in-app notifications.
Reporting:
Integrates with Windows Analytics for insights into the software environment.
Using windows Analytics with configuration manager:
Windows analytics is nothing but a collection of solutions that run on the Microsoft operational management suite. This solution allows users to form any kind of insight into the current state of the software environment. Devices in the software environment also report the telemetry data. The data can be accessed through the operations management suite web portals.
Mobile device management:
Updates to Android devices for work-sharing configuration management:
Includes updates for Android work profile settings and enrollment restrictions for Android and iOS devices.
Android and IOS enrollment restrictions:
Here users can be allowed to specify the enrollment in any personal Android or IOS devices. With the Android devices, there is a limit restriction on enrollment but with the IOS devices, users can easily block the enrollment with the help of Apple device enrollment settings.
Protect devices:
Newly software update includes the specific trust files and data folders options in Device Guard policy settings. And also advanced capabilities are added to this device guard policy management.
Advantages of SCCM:
There are a lot of advantages of using SCCM, let me explain them one by one,
Empowers User Productivity: It allows users to access necessary devices and applications while ensuring corporate compliance and control.
Unified Infrastructure: It offers a single platform for managing physical, virtual, and mobile devices.
Efficient Change and Configuration Management: It provides tools for seamlessly managing software changes and configurations on the Microsoft platform.
Rapid Software and Update Deployment: It facilitates quick and cost-effective distribution of software apps and updates, including security patches.
Comprehensive Hardware and Software Inventory Management: It streamlines hardware and software inventory collection and management.
Operating System Deployment: It supports efficient deployment of operating systems across various devices.
Software Usage Metering: It monitors and reports software usage, aiding and resource management.
Affordable IT Management Solution: It offers a cost-effective solution for comprehensive IT management.
Database Growth Tracking: Enables monitoring of SQL Server database growth for optimized database management.
Remote Computer Control: It allows remote control of computers for troubleshooting and support.
Enhanced IT Environment Visibility: It provides greater insight into the IT infrastructure, improving decision-making and management.
Conclusion
In this blog, I have tried my best to explain the key factors involved in installing SCCM software and its advantage. SCCM is a popular Microsoft product; SCCM is used to update system management. The complete SCCM installation guide enables you to become a master in this. This blog may help a few of those who are Windows server professionals, and also for Microsoft social community forums.
To provide the best experiences, we use technologies like cookies to store and/or access device information. Consenting to these technologies will allow us to process data such as browsing behavior or unique IDs on this site. Not consenting or withdrawing consent, may adversely affect certain features and functions.
Functional
Always active
The technical storage or access is strictly necessary for the legitimate purpose of enabling the use of a specific service explicitly requested by the subscriber or user, or for the sole purpose of carrying out the transmission of a communication over an electronic communications network.
Preferences
The technical storage or access is necessary for the legitimate purpose of storing preferences that are not requested by the subscriber or user.
Statistics
The technical storage or access that is used exclusively for statistical purposes.The technical storage or access that is used exclusively for anonymous statistical purposes. Without a subpoena, voluntary compliance on the part of your Internet Service Provider, or additional records from a third party, information stored or retrieved for this purpose alone cannot usually be used to identify you.
Marketing
The technical storage or access is required to create user profiles to send advertising, or to track the user on a website or across several websites for similar marketing purposes.


:max_bytes(150000):strip_icc():format(jpeg)/Health-GettyImages-1474168288-dd2ee977be834735bc8aad0b1af9c74e.jpg "A person applying lipstick while wearing a towel on their head focusing on personal care activity.")